Introduction
If you are in a café or another place with free wireless Internet access you are under a security risk. Your traffic can be monitored, captured and analysed. Your sensitive data can be stolen or your laptop infected with malicious application.
To avoid as much as possible of the above we can route all your traffic through the internet connection at home or in your office.
Configuration
As a base configuration you can use pfSense 2.0 RC1 configuration of OpenVPN Server for Road Warrior with TLS and User Authentication
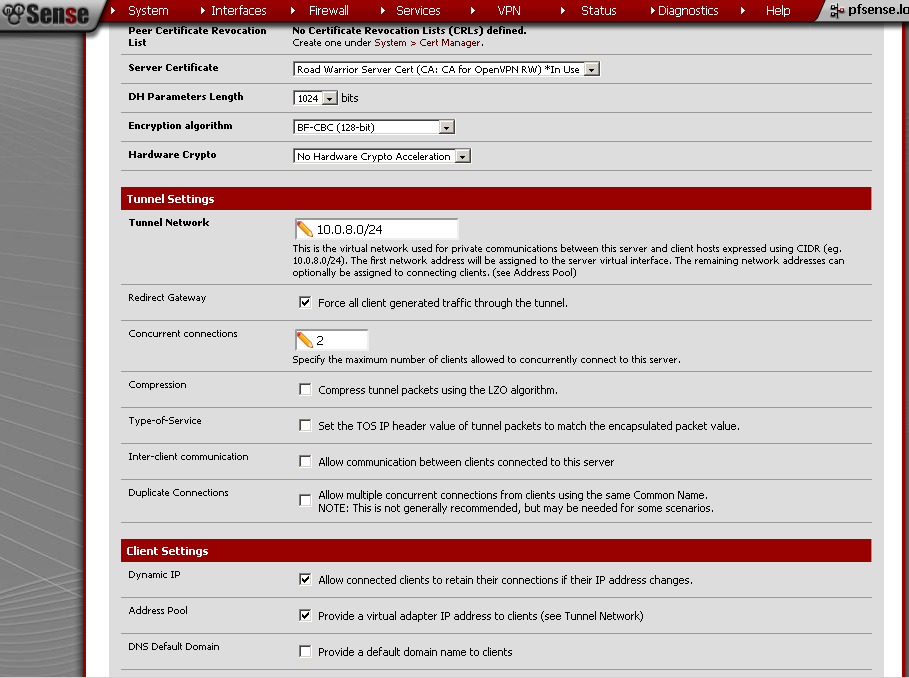
up until the Tunnel Settings section of the OpenVPN Configuration.
There tick the Redirect Gateway.
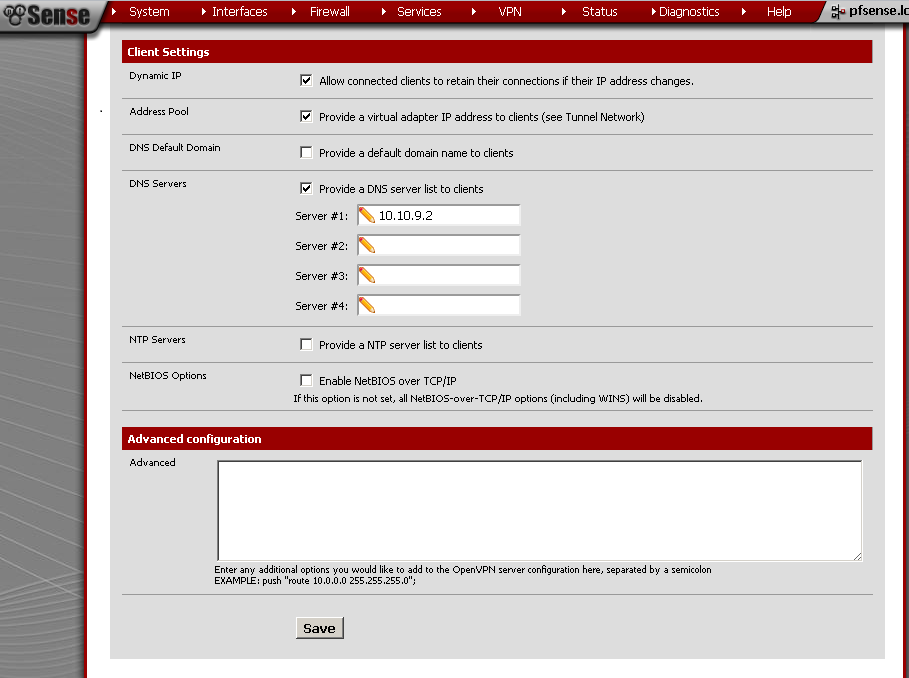
Under Client Settings enter DNS Server 1 as the IP address of you LAN interface.
Explanation
By doing so you will redirect all your traffic through the VPN connection and avoid the risks related to the publicly available Internet access hotspots. The addition of DNS server address is needed in order to use you own device to resolve web sites IPs instead of the publicly available DNS server of the hotspot.
Testing
As a test you can trace route (tracert bbc.co.uk for example) a popular internet site with or without established VPN Connection.
Conclusion
At the cost of building just another VPN Server on your device you are gaining a little peace of mind while surfing the net from insecure location.


Is there a way to edit the config file for this instead of doing the entire process over again?
You can edit the configuration of already working VPN. My idea was to have two separate configurations, one using the GW of the guest network, and one routing all client’s traffic through the VPN Connection.
So you would create two VPN servers under the OpenVPN tab? the second server would follow this guide?
How do you select the different configuration files with the OpenVPN client since you dump each config in the config folder?
Thanks for the help
Thanks
I would just copy/paste the client configuration file and then change the port on the second.
Hi, i want to setup a LAN-to-Lan with warcraft dota, i have 2 networks (2 LAN shops).
shop 1 = 192.168.0.1/24, WAN = DHCP, shop 2 = 192.168.1.1/24, WAN = DHCP, im planning to connect these 2 different lan so my clients can play DoTa using that scheme.. is it possible???
i’m using pfsense 2.0.1…
Good job, i have read many of your articles lately since it has not been long from when i managed to install pfSense 2.0 to my buggy hyper-v AMD server :D.
I would like to ask if it is possible to use:
road warrior (with push redirect getaway) connecting to pfsense vpn and also the road warrior be filtered by the squidquard rules of the pfsense box.