Skip to content

Stefcho's Tech Blog

Software Development, Cloud, DevOps and PfSense

Tag: pfSense

pfSense One Last Time

Posted on 17/03/2019 - 17/03/2019 by Stefan

I’ve built my first pfSense router almost a decade ago. Fun fact is that the device is still working flawlessly, Alix2d13 is a beast. At that time 100 Mbps was more than enough compared to the offerings of the ISPs. Fast forward ten years, my WAN links are above this speed. CPU and RAM combined with the embedded architecture impose heavy limitations on the plugin options.

Still remember the time when equipped with console cable hooked to the Alix running pfSense v 1.2.2. Holding tight to my hard copy of pfSense The Definitive Guide to the Open Source Firewall and Router Distribution Book. I’ve typed on the terminal. These days are long gone.

Currently running on a Dual Core Intel CPU with 8 GB RAM and SSD, pfSense is v 2.4.4. The book is freely available online. It makes very little sense to me writing tutorials on how to do this and that any more. The only exception are some obscure cases that are rare and sharing them will be mutually beneficial.

In retrospective PfSense has gone a long way for the past 9 years. The project changed hands and lost some of its founding father. These changes steered the project in a direction that is not so much to my liking. To get a taste please review the following quotes:

pfSense 2.5 and AES-NI

pfSense version 2.5 will be based on FreeBSD 12, which should bring route-based IPsec, along with support for our integrated management platform, NRDM (more about this soon), and a number of other features.

With the increasing ubiquity of computing devices permeating all areas of our lives at work and at home, the need for encryption has become more important than ever. Desktops, laptops, smart phones, tablets, and many other devices all share this need to be able to encrypt sensitive information. Without encryption, everything you send over a network (or even store on a local storage device) is in the open, for anyone to read anytime he wants to read or even change it.

While we’re not revealing the extent of our plans, we do want to give early notice that, in order to support the increased cryptographic loads that we see as part of pfSense version 2.5, pfSense Community Edition version 2.5 will include a requirement that the CPU supports AES-NI. On ARM-based systems, the additional load from AES operations will be offloaded to on-die cryptographic accelerators, such as the one found on our SG-1000. ARM v8 CPUs include instructions like AES-NI that can be used to increase performance of the AES algorithm on these platforms.

The AES-NI instruction set extensions are used to optimize encryption and decryption algorithms on select Intel and AMD processors. Intel announced AES-NI in 2008 and released supported CPUs late 2010 with the Westmere architecture. AMD announced and shipped AES-NI support in 2010, starting with Bulldozer.

Please remember these requirements when you are considering components for your pfSense system.

More on AES-NI

There have been some concerns expressed about the requirement for AES-NI (or other offload) with pfSense 2.5, as announced two days ago.

Some complained that, since they don’t use VPN, they don’t need AES-NI. While I wasn’t quite ready to say more about the “3.0” effort, it is the reason for the new requirement for pfSense 2.5 and beyond.

With AES you either design, test, and verify a bitslice software implementation, (giving up a lot of performance in the process), leverage hardware offloads, or leave the resulting system open to several known attacks. We have selected the “leverage hardware offloads” path. The other two options are either unthinkable, or involve a lot of effort for diminishing returns.

So why the requirement?

Future versions of pfSense have a new management model. We’re leveraging YANG, via RESTCONF.

The webGUI will be present either on our cloud service or on-device, both talking to the ‘back-end’ (written in ‘C’) on the device via a RESTCONF interface. This is just as I said back in February 2015.

We’re leveraging AES-GCM inside TLS as the transport layer, because RFC 7525 REQUIRES it, and the RESTCONF standard, RFC 8040, says RFC 7525 is a SHOULD.

AES-GCM in particular has problems with side-channel attacks on pure software implementations. ChaCha20, which nicely avoids these issues when in software, isn’t an option. This is because: a) it’s not RFC-compliant, and b) there are currently no acceleration offloads for it, and the situation is that there could be thousands, or tens of thousands of pfSense instances hitting a single (clustered) instance of our cloud management platform.

So the choice is either to design, engineer and release a less-than-strong product, or require AES-NI or other offloads.

The entire PHP layer is being eliminated in the “3.0” effort, and we’re simply too small to continue to maintain both the current, organically-grown PHP layer (100K lines of PHP in 200 files) and the new, pure JS GUI (client) architected as a single page web application.

So there is an excellent chance that pfSense 2.5 will use the new webGUI, talking to our RESTCONF back-end.

As should be obvious by now, this isn’t about VPN.

It’s Still Free to Use

If you’ve been testing 2.4 snapshots and updates, you’ve already seen a lot of new features. You have probably also seen a new pop-up in the webGUI.

Trademark Policy pop-up
While the pop-up is new, the message isn’t. On January 27, 2017 we posted a blog Announcing a new trademark policy for pfSense. This pop-up is a simple reminder that ensures everyone sees and acknowledges the trademark policy.

For our end users and customers, nothing has changed. pfSense Community Edition (CE) remains a free and open product available for your personal or business use. This is true if you buy hardware from us or not. This notice addresses those who take pfSense CE and sell it, infringing our policy while not giving back to the project and directly competing with Netgate.

At Netgate, we engineer, build, test, and give pfSense software to the community for free. Accepting the pop-up affirms your agreement and right to use, but not sell, pfSense software.

After reading these articles and looking at my old faithful Alix. It is time to look for alternatives. One possibility is OPNsense

These two articles condense a long story, hope you find them informative:
I’ll share just a small quotes from them.

OPN VS. PF

OPNSense is a fork of PFSense, and PFSense is itself a fork of m0n0wall.


The story gets even more interesting:
Building a BSD home router (pt. 6): pfSense vs. OPNsens


Once upon a time… in 2003 there was a new firewall OS called m0n0wall. Manuel Kasper had built it on a stripped down version of FreeBSD. There had been small firewalls before, but Kasper’s innovation was to put a Web GUI on top of it so that the firewall’s settings could be controlled from the browser! It did not take long and m0n0wall took the world by storm. However Kasper’s project focused on embedded hardware. So only a while later a fork was created which geared towards more powerful hardware. The fork’s name? You’ve guessed it: pfSense. In 2015 Manuel Kasper officially ended the m0n0wall project (because recent versions of FreeBSD had been grown too big to be easily usable for what he did with it in the past). And guess what he did: He gave his official blessing and recommends to migrate to and support OPNsense!

So if I want to go with pfSense I need to get a box with CPU supporting these AES-NI instructions. For this either get a branded box or build one on my own. Naturally I’ve chosen the latter.

In selecting the box I have to thank to the great members of the community forum of pfSense.
Alternative to Qotom Q190G4 with AES-NI?

My choice of box is this quiet beast:

QOTOM 4 LAN Mini PC with Core i3-4005U / i5-5250U processor and 4 Gigabit NIC, support AES-NI, Serial, Fanless Mini PC pfSense

Product properties: i5-5250U, 8G RAM, 128G SSD + Q355G4 WIFI $ 350.42

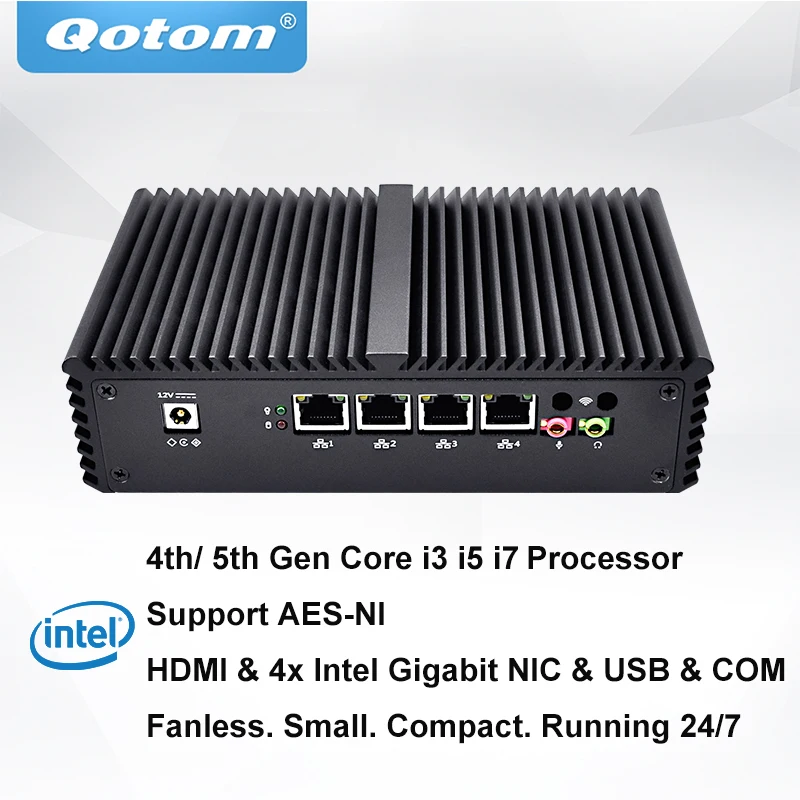
The fan less design combined with the SSD makes the operation completely silent. It keeps a steady 50 C temperature, with average CPU usage of 1-4 % and consumes only 7 – 10 % of the memory. My hopes are that this will serve me for at least the next 10 years. As it is x86 architecture my choice of OS dramatically widens leaving the door open to experiments with whatever comes to my mind.

Posted in TechnicalTagged AES-NI, pfSense, Qotom

Multi-WAN with pfSense HTTPs Sites Issue

Posted on 09/03/2019 - 09/03/2019 by Stefan

I’ve been running pfSense in Dual WAN mode for more than a decade. Unfortunately, some sites lately are quite sensitive per user session originating from multiple public IP addresses. The best description of the problem is from the official pfSense documentation:

Some websites store session information including the client IP address, and if a subsequent connection to that site is routed out a different WAN interface using a different public IP address, the website will not function properly. This is becoming more common with banks and other security-minded sites. The suggested means of working around this is to create a failover group and direct traffic destined to these sites to the failover group rather than a load balancing group. Alternately, perform failover for all HTTPS traffic.

The sticky connections feature of pf is intended to resolve this problem, but it has historically been problematic. It is safe to use, and should alleviate this, but there is also a downside to using the sticky option. When using sticky connections, an association is held between the client IP address and a given gateway, it is not based off of the destination. When the sticky connections option is enabled, any given client would not load balance its connections between multiple WANs, but it would be associated with whichever gateway it happened to use for its first connection. Once all of the client states have expired, the client may exit a different WAN for its next connection, resulting in a new gateway pairing.

Problems with Load Balancing


After some testing and consideration let’s leave the sticky connections unchecked. As mentioned above they are problematic.

Other description of the problem here:

Some websites do not work properly if requests from the LAN are initiated from multiple public IP addresses. Hence load balancing is incompatible with these sites. Common examples are sites that maintain login sessions, most frequently online banking. This is most commonly observed with HTTPS sites so usually HTTPS should not be load balanced. Occasionally it is a problem with HTTP sites that maintain session, but this is rare.

For sites that do not function with load balancing, add firewall rules to not load balance traffic to these destinations or protocols.

Web site incompatibility with changing IP addresses


To alleviate this issue, you can do the following:

Here are my two Gateways


Make two Gateway Groups

One for Load Balancing

Set for both Gateways Tier 1

One for Failover

Set Tire1 for the one and Tier 2 for the second

Go to the LAN Rules

Set the default LAN rule to use the Load Balancing Gateway Group.

Add new rule that will be valid only for HTTPS connection and set the Gateway to the Fail-over Gateway Group.

This way all HTTPS connections will pass through the First WAN until it goes down and failover to the Second. The alternative is to make separate rule for each and every HTTPS site with issues. The rule will be very similar to the one for HTTPS. The difference will be that Destination address will be single Public IP. Doing so will load balance all other HTTPS connection that don’t have this problem.

Posted in TechnicalTagged Dual-WAN, HTTPS, pfSense

pfSense 2.4.4 Released

Posted on 04/10/2018 - 28/10/2018 by Stefan

Hello everyone,

The new version 2.4.4 if finally here. You can check what’s new here.


Posted in TechnicalTagged pfSense

Sharing a Port with OpenVPN and a Web Server

Posted on 04/03/2016 - 28/10/2018 by Stefan

Sharing a Port with OpenVPN and a Web Server

Routing your entire internet traffic over VPN when away from home is almost a must. Especially when using public WiFi hotspots or hotel internet.

Hello all, long time no see. I have a lot of other engagements lately and can’t reach to our beloved topic of pfSense. The fact that I don’t write new posts does not mean that I have abandoned it. Sometimes you have to put priorities to things in your life that are not as pleasant as other, but are just as much if not more important.

Enough said about that. Let’s get to the topic.

Recently I was visiting Asian country. As you probably know there are some places that some sites are restricted for access. It was a strange experience to not be able to open pages that you usually use every day. On other hand I would prefer to route all traffic over my Internet connection back at home when in a foreign country. Just as a protection.

So for test purposes I’ve setup an OpenVPN instance to check if I’m able to route all my traffic back home.

During my research I’ve came across very interesting article on the pfSense documentation. The article is: “Sharing a Port with OpenVPN and a Web Server”

It works and the only modification that has to be made to the OpenVPN server configuration are as follows:

  1. Set the protocol to TCP in the General Information sectionSharing a Port with OpenVPN and a Web Server 01
  2. Don’t forget to tick in the Tunnel Settings > Redirect Gateway

(Force all client generated traffic through the tunnel.)

Sharing a Port with OpenVPN and a Web Server 03

  1. In Advanced configuration section in Advanced field put the following:

port-share localhost 443Sharing a Port with OpenVPN and a Web Server 02

The old OpenVPN configuration instructions you can find here:

pfSense 2.0 RC1 configuration of OpenVPN Server for Road Warrior with TLS and User Authentication

Now you can connect to your pfSense / OpenVPN server on HTTPS and hopefully it would appear much like you are opening a page over SSL.

Have fun and as usual I don’t take any kind of responsibly for the way you use this setup, or any legal actions or consequences for that matter or related to it.

Posted in TechnicalTagged OpenVPN, pfSense

pfSense 2.2 Released!

Posted on 24/01/2015 - 28/10/2018 by Stefan

It’s been a while since I’ve been digging in pfSense. A lot of things had happened. The good news is that currently I’ve got a few projects related to the topic and will make a few posts about them. Next post will be related to upgrading to 2.2 from 2.1.5.

In the meantime you can check what are the new features in this release here:

2.2 New Features and Changes

The official article about the release:

pfSense 2.2-RELEASE Now Available!

and of course the Upgrade Guide


Posted in TechnicalTagged pfSense, pfSense 2.2

pfSense 2.0 Release Now Available!

Posted on 25/09/2011 - 18/02/2019 by Stefan

The 2.0 release is finally available.

Here is the news:

2.0 Release Now Available!

My experience so far is good, I’ve already upgrade some of my machines.

You can take a look at the upgrade process from RC3 to RTM here:


Before performing any kind of upgrade read carefully the Upgrade Guide!!!


Posted in TechnicalTagged pfSense, Technical5 Comments

Using your OpenVPN Road Warrior setup as a Secure Relay

Posted on 07/09/2011 - 18/02/2019 by Stefan

Introduction

If you are in a café or another place with free wireless Internet access you are under a security risk. Your traffic can be monitored, captured and analysed. Your sensitive data can be stolen or your laptop infected with malicious application.

To avoid as much as possible of the above we can route all your traffic through the internet connection at home or in your office.

Configuration

As a base configuration you can use pfSense 2.0 RC1 configuration of OpenVPN Server for Road Warrior with TLS and User Authentication

up until the Tunnel Settings section of the OpenVPN Configuration.

There tick the Redirect Gateway.


Under Client Settings enter DNS Server 1 as the IP address of you LAN interface.

Explanation

By doing so you will redirect all your traffic through the VPN connection and avoid the risks related to the publicly available Internet access hotspots. The addition of DNS server address is needed in order to use you own device to resolve web sites IPs instead of the publicly available DNS server of the hotspot.

Testing

As a test you can trace route (tracert bbc.co.uk for example) a popular internet site with or without established VPN Connection.

Conclusion

At the cost of building just another VPN Server on your device you are gaining a little peace of mind while surfing the net from insecure location.

Posted in TechnicalTagged Network, OpenVPN, pfSense, pfSense 2.0 RC3, Technical7 Comments

Upgrade Alix board with pfSense 1.2.3 to pfSense 2.0 RC3

Posted on 20/08/2011 - 18/02/2019 by Stefan

Introduction

After having  enough of tests with the RC3 in virtual environment, I decide to upgrade my pfSense 1.2.3 appliance running on Alix2d13. Considering my Dual WAN setup with load balancing and some other rules, I didn’t really want to lose any of my configurations during this process.

If I made in-place upgrade what is my rollback strategy?!

If I performed clean install and just restored configuration backup what are the guaranties that is will work. Of course I can test it in my virtual lab, but there are risks with the physical scenario that I can’t predict using this method. So I needed and alternative.

Scenario

I want to test upgrade my pfSense 1.2.3 to 2.0 RC3. For that purpose I need a reliable rollback plan with no data loss, and minimal operations required. How did I achieve it you can find in the Explanation section.

Setup

The setup is described in this post: SoHo Firewall Appliance with Alix2d13 and pfSense

,noting change there since.

Configuration

First I made a backup of the full configuration of the 1.2.3, you know just in case.

Then download the image file: pfSense-2.0-RC3-4g-i386-20110621-1821-nanobsd-upgrade.img.gz

And extract the image from the archive.

Now as it is described here: Installation on a standard PC (CF/IDE version)

We need the physdiskwrite tool to write the image to the Compact Flash (CF). I’ve used the

physdiskwrite 0.5.2 + PhysGUI

Then I plug in the new CF in the card reader make sure there are no portions on it using the Disk Management Console (Start > Run> diskmgmt.msc), otherwise you will receive error message like the one in the Issue section below.

Then start physdiskwrite with PhysGUI, select the CF disk.

Right click on the disk select Image laden (Load Image), Offnen (Open). Brows to the extracted image and select it.

You will see this warning message window, tick the check box next to Remove 2GB restriction, mine is 8 Gigs, if your CF is smaller then don’t.

Yet another warning message windows, asking you if you really want to overwrite the disk with the image.

No you have about 20 – 30 minutes of waiting, so be patient, do some other stuff.

We are ready.


Explanation

Finally I get it, instead of changing the content of my original Compact Flash, why not get second one and use is for the tests instead? This way I can retain my original configuration and with just a swap of the cards be right back where I started.

Testing

After successful installation I’ve just swap the CFs and configured pfSense 2.0 RC3 using console cable.

Then using the WebGUI restored the backup configuration from the 1.2.3. Now it is time to check the functionality.

The Interface configuration like interfaced configuration was in place but the Load Balancing configuration was gone. Also my OpenVPN configurations were restored but in a non-working state. The firewall rules were applied but with the missing Load Balancer there was little use of them. After about half hour of checks, I decided to roll back to 1.2.3. Swap the CFs again and everything works the old way.

Issues

Writing to the CF card, As stated in Special considerations for Windows Vista/7

If you get write errors shortly after physdiskwrite has begun writing to the target disk (usually after 65536 bytes), this may be caused by existing partitions on the disk. Use the Disk Management utility (right-click on the “Computer” icon on the desktop and select Manage, then navigate to Computer Management (Local)/Storage) to delete all partitions on the target disk before starting physdiskwrite.

If you are unable to delete all the partitions with the Disk Management utility, try the following procedure:

1.     Open a command window as admin (“cmd”)

2.     Type “diskpart” and hit enter.

3.     Type “list disk” and hit enter to find out the number of your drive.

4.     Type “select disk X” (where you replace X with the number of your drive) and hit enter.

5.     Type “clean” and hit enter.


So I had to clean the disk first but it was a breezy task. Then everything was alright.

Conclusion

Up until the restoration of the configuration backup everything is ok. Now I have to test the restoration in my lab, or better yet reproduce my original configuration there. I ought to think for the second alternative more.

To configure everything in the lab and then just backup and restore the configuration from the same one and the same version sound reasonable to me. Better yet I will know that it works.

I’ll have to test Dual WAN in fail-over configuration, then test recreate my OpenVPN configurations, and test all the rules that I have applied.

Posted in TechnicalTagged pfSense, pfSense 2.0 RC33 Comments

OpenVPN on pfSense 2.0 RC3 with OpenLDAP Authentication on CentOS 5.6

Posted on 13/08/2011 - 18/02/2019 by Stefan

Introduction

After writing OpenVPN with LDAP authentication on pfSense 2.0 RC1, a reader of my blog shared some problems with configuring OpenLDAP on CentOS.  So I decide to build such a setup and test.

Scenario

The scenario is as follows, authenticating users requiring access to the OpenVPN server against OpenLDAP service running on CentOS.

Setup

I’ve spent most time in preparing the CentOS server. Initially my decision was to use CentOS 6.0, but after a few failed attempts to configure it and the absence of how to guides for this purpose, I’ve decided to fall back to 5.6.

For this version there is a wonderful how to guide here:

OpenLDAP on CentOS 5.6

Install And Configure OpenLDAP 2.4.25 On CentOS 5.6

Following this instructions I’ve managed to setup OpenLDAP very fast.  The only comment that I have is in this section:

All data loaded is in LDIF format. Create a file to initialize the LDAP database:

# vi ldap-init.ldif

dn: dc=mycompany,dc=com

objectclass: dcObject

objectclass: organization

o: Example

dc: mycompany

dn: cn=Admin,dc=mycompany,dc=com

objectclass: organizationalRole

cn: Admin


you have to have one new row, otherwise the import in the next step fails. So the above should look like:

# vi ldap-init.ldif

dn: dc=mycompany,dc=com

objectclass: dcObject

objectclass: organization

o: Example

dc: mycompany


dn: cn=Admin,dc=mycompany,dc=com

objectclass: organizationalRole

cn: Admin


Next step is to create a few test users.  For that purpose I’ve used :

LDAP Admin

Ldap Admin is free Win32 administration tool for LDAP directory management. This application lets you browse, search, modify, create and delete objects on LDAP server. It also supports more complex operations such as directory copy and move between remote servers and extends the common edit functions to support specific object types (such as groups and accounts).

You can use it to manage Posix groups and accounts, Samba accounts and it even includes support for Postfix MTA. Ldap Admin is free Open Source software distributed under the GNU General Public License.

Configuration

It is time to configure the pfSense. I will skip all the steps described in the previous posts. You can find them here:

pfSense 2.0 RC1 configuration of OpenVPN Server for Road Warrior with TLS and User Authentication

OpenVPN with LDAP authentication on pfSense 2.0 RC1

Now let’s get straight to System > User Manager and on the Servers leaf.

Hostname or IP address: this it the address of the CentOS server

Base DN: this is the domain name

Authentication container: after insterted the Bind credentials, it was visible, but when I’ve click on the Save button, nothing happen. So I’ve typed it in manually.

Bind Credentials: enter User DN and Password. , I’ve tested it and with Use anonymous binds to resolve distinguished names, it works also.

Group Member Attribute: you can modify this with the Uid=%s, if you need.

Testing

Just for reference this is my test user.

After preforming the OpenVPN configuration, enter the user name and the password.

If everything is OK, you should be successfully connected and see something similar in the OpenVPN logs:

You can also test the connection using the Diagnostics > Authentication, Select the Authentication Server, in my case the CentOS OpenLDAP connection is named Test. Enter Username and Password, and see the result.

If you get error, you can check the Status> System Logs on the System leaf for errors.

I’ve got this error when the CentOS server was turn off.

Issues

The issues that I faced was the problem with selecting the OU in which my users resides. Hope this will be fixed in future versions. On the CentOS side the problems were releted with the changes of OpenLDAP in the 6.0 version.

Conclusion

That’s it. Thank you for reading.

Posted in TechnicalTagged CentOS, LDAP, OpenLDAP, OpenVPN, pfSense, pfSense 2.0 RC3, Technical2 Comments

Posts navigation

Older posts

Tags

ADDS AES-NI Asterisk ASUS Azure Captive Portal Cell Phone CentOS Certification Creative DD-WRT DNS Hyper-V LDAP Learning Linksys Microsoft Mikrotik RouterBoard RB250G Network OpenLDAP OpenVPN OpenWrt pfCenter pfSemse pfSense pfSense 2.0 RC1 pfSense 2.0 RC3 pfSense 2.2 PKI RADIUS Raspberry Pi Routing Site To Site Technical Uncategorized VLAN VMWare VoIP Vyatta Web Sites Windows Server 8 Windows Server 2008 R2 Windows Server 2012 R2 Wireless Workstation 8

Archives

  • April 2020
  • July 2019
  • May 2019
  • March 2019
  • February 2019
  • October 2018
  • August 2018
  • March 2016
  • April 2015
  • March 2015
  • January 2015
  • February 2012
  • October 2011
  • September 2011
  • August 2011
  • July 2011
  • June 2011
  • May 2011
  • April 2011
  • March 2011
  • February 2011
  • July 2010
Proudly powered by WordPress | Theme: micro, developed by DevriX.