Skip to content

Stefcho's Tech Blog

Software Development, Cloud, DevOps and PfSense

Tag: DD-WRT

1 : 1 NAT in pfSense and DD-WRT

Posted on 08/04/2011 - 18/02/2019 by Stefan

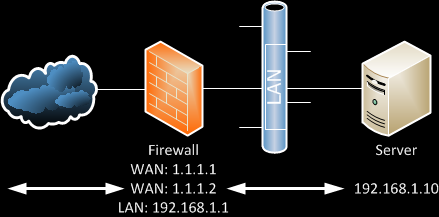
Sometimes you need to map internal machine IP to real IP address accessible from the Internet.As on the diagram if someone makes a request to 1.1.1.2, the request is send to 192.168.1.10.

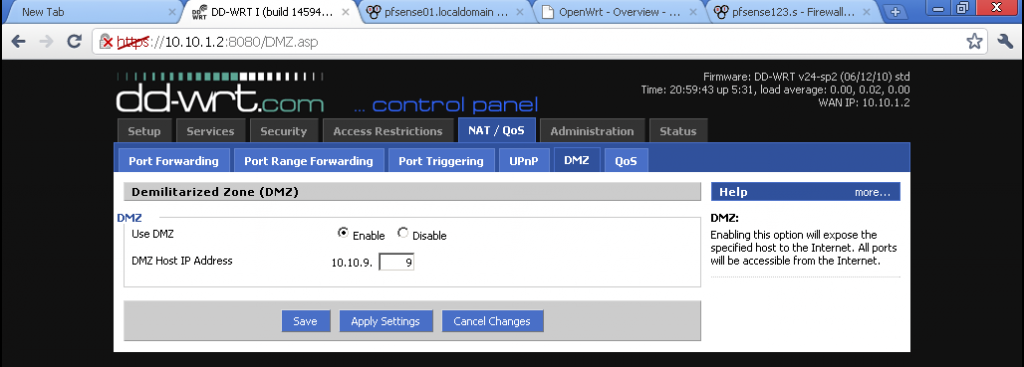
On DD-WRT you can use DMZ. This service is pseudo-DMZ, more commonly known outside of the SoHo routes as Exposed host.

To set is up enter the NAT / QoS section, then select the DMZ subsection, and configure your internal IP. For more information read here

Be warned that exposing all port of a machine to the Internet is very insecure, and even worse if the machine does not have some kind of firewall.

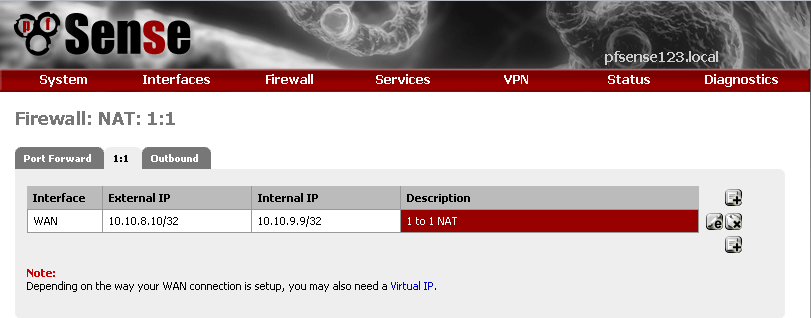
In pfSense, the alternative is to use VIP and 1:1 NAT

You can’t do that in 1.2.3, if you have only one WAN IP, if you do an error message appears: “The WAN IP address may not be used in a 1:1 rule”. Alternative is to make a port forward, which is much more preferable especially if not all ports are included.

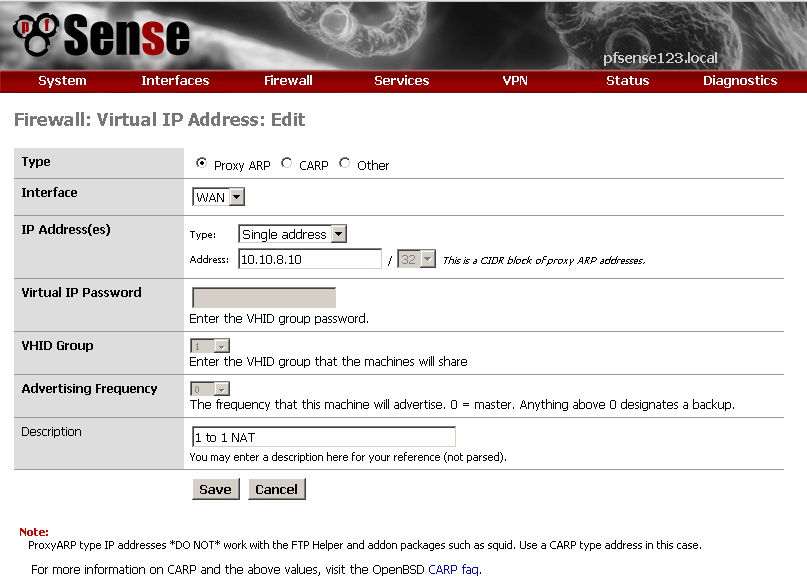
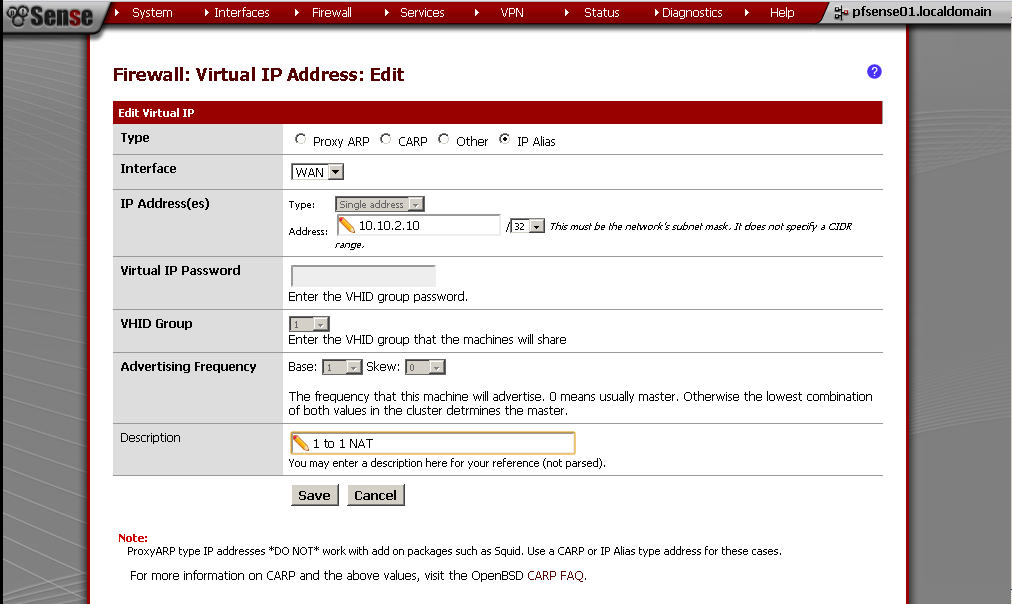
So first you must add your additional WAN IP in the Virtual IP section.

For Type you can choose between Proxy ARP and CARP, detailed explanation why check out here

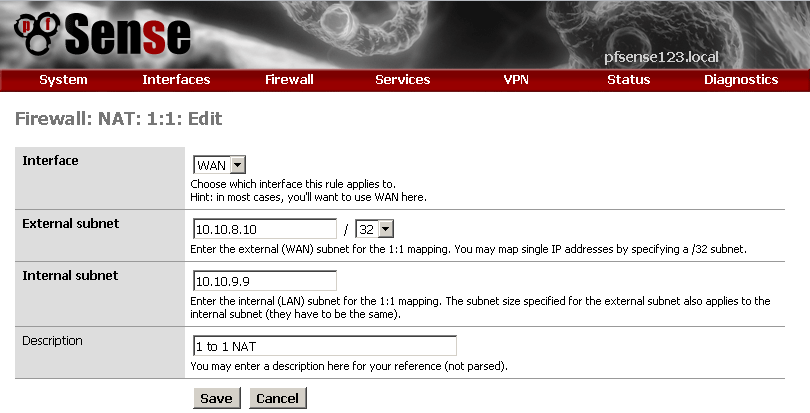
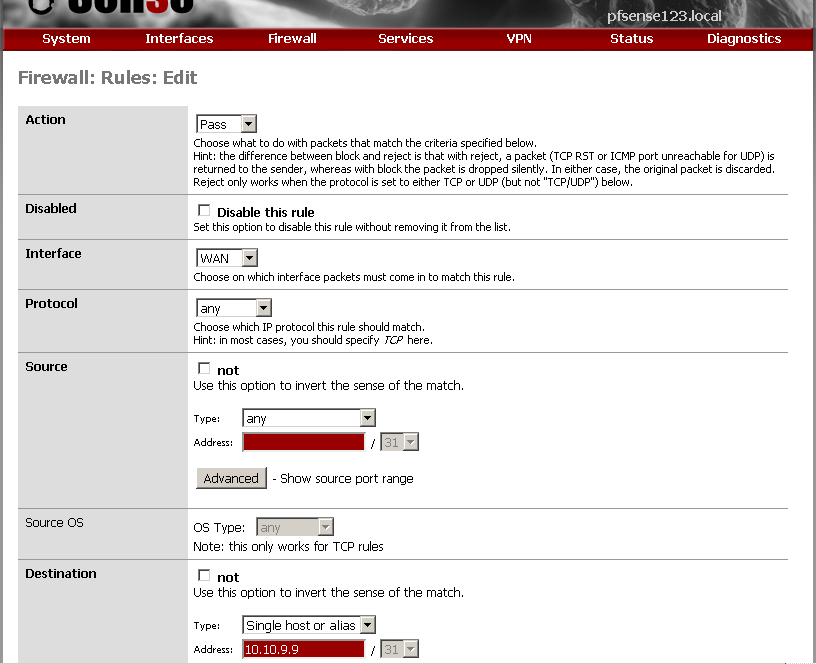
Then create a 1 : 1 NAT rule

Nothing special in the configuration, just enter your internal and external IPs and description for the rule.

You must make a firewall rule for all this to work, enter the internal LAN IP address as destination.

On pfSense 2.0 RC1, except the huge amount of new options the only difference is the new option in the Virtual IP type selection. The IP Alias works fine in this setup. The other good news is that even if you have only one WAN IP address you can use is in such setup. The bad news is that you do use it you can’t use your WAN IP for anything else, all port on the WAN IP are mapped to the machine on the LAN.

Alright so far this was the case if you have need to publish only one IP, but if you need to do this for multiple machine and have more than one WAN IP address, the procedure is a little different.

On pfSense you just repeat the procedure as many times as you need.

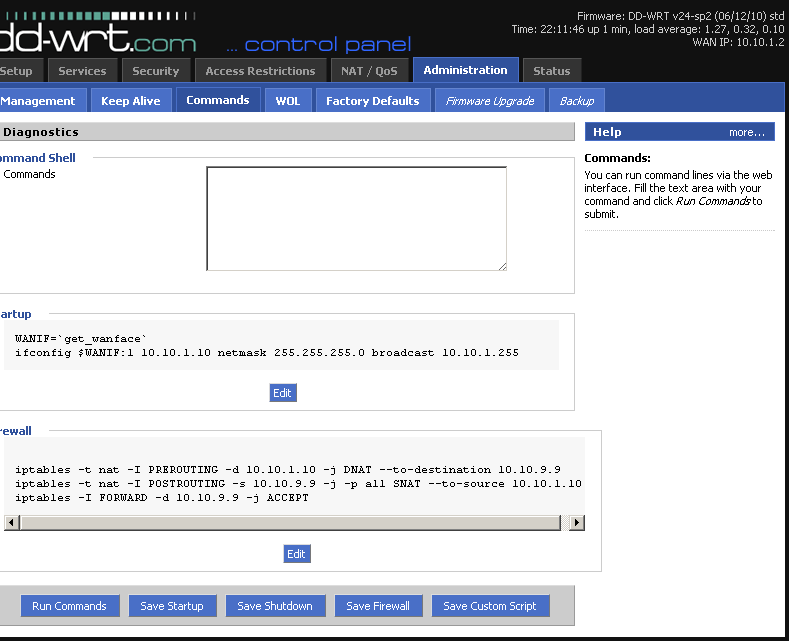
On DD-WRT you can add some iptables rules.

Add these lines to the Startup script:

WANIF=`get_wanface`

ifconfig $WANIF:1 10.10.1.10 netmask 255.255.255.0 broadcast 10.10.1.255

This adds the new WAN Ip to the Interface

Add these lines to the Firewall script:

iptables -t nat -I PREROUTING -d 10.10.1.10 -j DNAT –to-destination 10.10.9.9

iptables -t nat -I POSTROUTING -s 10.10.9.9 -j -p all SNAT –to-source 10.10.1.10

iptables -I FORWARD -d 10.10.9.9 -p all –dport all -j ACCEPT

10.10.1.10 – this is the WAN IP address

10.10.9.9 – this is the LAN IP address

Add these lines for as many IP as you have / need. More on the topic here.

In conclusion, this is a very quick and dirty way to publish internal machine to the internet, bear in mind that this host is fully exposed to anybody on the Internet. I personally don’t recommend this way of publishing, but if need arise you can consider this an option. In future posts I will try to present more smart and safe ways to publish some service.

Posted in TechnicalTagged DD-WRT, pfSense5 Comments

Running DD-WRT on VMware Workstation 7.1

Posted on 03/04/2011 - 18/02/2019 by Stefan

Now that’s a tricky one.  The only official build that could be found is here

But it was published in the middle of 2008.  It is a pure v24, no Service Packs, this by itself makes it useless.

Guide for installing newer version is not available.

After searching the forums, the only usable thread that I found is this: VMware ready to use ..

Here stalonge share a pre-installed virtual machine ready to use.

My recommendation is to Restore it to Factory Default, and configure it to your preference.

Posted in TechnicalTagged DD-WRT, Network, VMWare

My Network Laboratory

Posted on 29/03/2011 - 18/02/2019 by Stefan

The easiest way to learn is by practice. This is especially true in IT. I have to lab out the migration from pfSense 1.2.3 to 2.0 RC1. Furthermore I have a site-to-site VPN setup that must be tested too.

I decided to expand my laboratory setup to house not just the two versions of pfSense, but DD-WRT and OpenWrt also. This will give me a opportunity to expand my test with alternatives. That is not enough, so let’s add two of each as virtual machines. Now we need a router in the middle to move the traffic between different subnets. Using any of the above will be redundant, so after browsing the VMware market for router appliance, as first option came Untangle, but I have already played around with it, and it is not appropriate for my purposes. As reasonable alternative is Vyatta. I had no experience with this appliance, and decide to check it out.

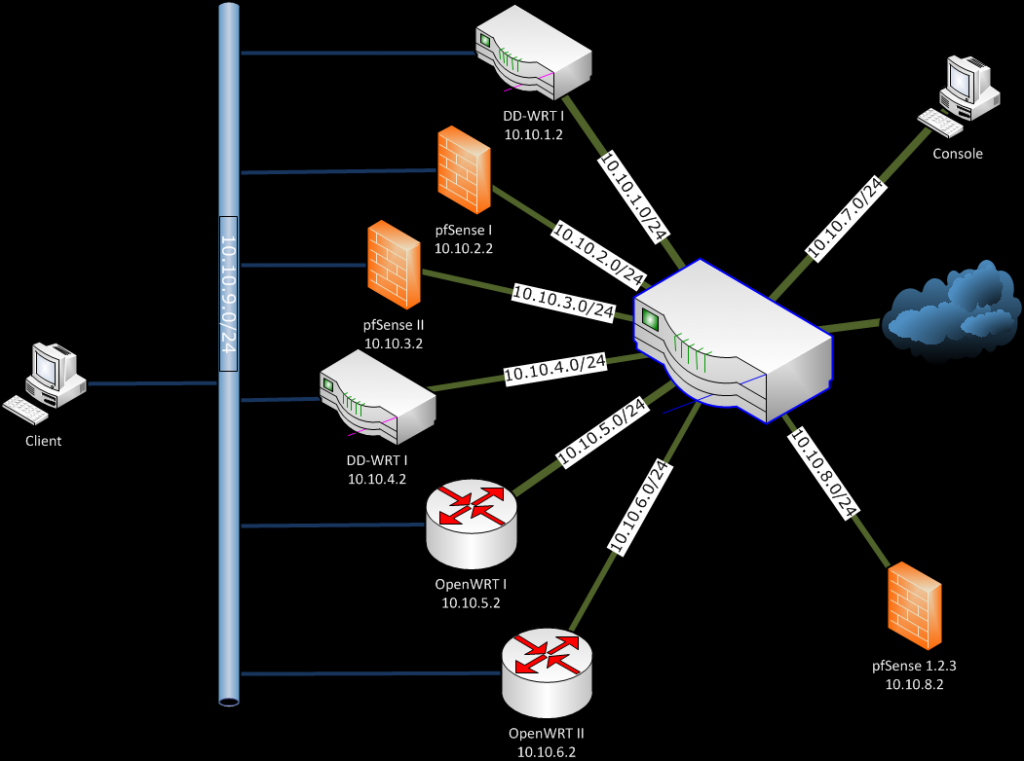
My finale network diagram looks like this:


The Console and Client are a simple Windows XP workstation from which to manage all the routers remotely by SSH and Web Interface.

As you can imagine if all the routers WAN addresses were in one sub-net, the Vyatta would be unnecessary, but my decision was based on the need to be able to test load balancing, fail over, and other scenarios in future.

In the following post I will discuss in details the configuration of each type of route. As a brief impression from the installation and configuration starting from the easiest to setup and going to the hardest ones.

PfSense have a Live CD, and is a breeze to install and configure on x86 virtual machine.

Then is the Vyatta, also available on Live CD that can be installed on virtual machine. For the configuration I have used the shell, only later to discover that there is a web interface that is somewhat helpful.

DD-WRT is hard to get on x86 virtual machine. I have opt out to find ready-made virtual machine and only to restore it to default configuration, and then to configure it to my preferences.

OpenWrt is even harder. On the forums the recommended way is to compile it for this architecture, and then install it. There is a wonderful tutorial here how to set it up on virtual box, but it does not work on VMware workstation. My guess is if you reconfigure the hard disk portions it will work. But yet again, my decision was to use ready-made virtual machine with the latest version, and configure it to my likings.


The easiest way to learn is by practice. This is especially true in IT. So now I have to lab out the migration from pfSense 1.2.3 to 2.0 RC1. Furthermore I have a site-to-site VPN setup that must be tested too.

I decided to expand my laboratory setup to house not just the two versions of pfSense, but DD-WRT and OpenWrt also. That is not enough, so let’s add two of each as virtual machines. Now we need a router in the middle to move the traffic between different subnets. Using any of the above will be redundant, so after browsing the VMware market for router appliance, as first option came Untangle, but I have already played around with it, and it is not appropriate for my purposes. As alternative to Untangle, Vyatta pop up from the result. I had no experience with this appliance, and decide to check it out.

My finale network diagram is like this:

The console and Client are a simple Windows XP workstation from which to manage all the routers remotely by SSH and Web Interface.

As you can imagine if all the routers WAN addresses were in one subnet, the Vyatta would be unnecessary, but my decision was based on the need to be able to test load balancing, failover, and other scenarios in future.

In the following post I will discuss in details the configuration of each type of route. Now let’s go from the fore a brief impression from the installation and configuration starting from the easiest to setup and going to the hardest ones.

PfSense have a live cd, and is a breeze to install and configure on x86 virtual machine. The only interesting this here is how to publish the web interface and the SSH on the WAN.

Then is the Vyatta, also available on live cd that can be installed on virtual machine. For the configuration I have used the shell, only later to discover that there is a web interface that is somewhat helpful.

DD-WRT is hard to get on x86 virtual machine. I have opt out to find ready-made virtual machine and only to restore it to default configuration, and then to configure it to my preferences.

The easiest way to learn is by practice. This is especially true in IT. I have to lab out the migration from pfSense 1.2.3 to 2.0 RC1. Furthermore I have a site-to-site VPN setup that must be tested too.

I decided to expand my laboratory setup to house not just the two versions of pfSense, but DD-WRT and OpenWrt also. This will give me a opportunity to expand my test with alternatives. That is not enough, so let’s add two of each as virtual machines. Now we need a router in the middle to move the traffic between different subnets. Using any of the above will be redundant, so after browsing the VMware market for router appliance, as first option came Untangle, but I have already played around with it, and it is not appropriate for my purposes. As reasonable alternative is Vyatta. I had no experience with this appliance, and decide to check it out.

My finale network diagram looks like this:

The Console and Client are a simple Windows XP workstation from which to manage all the routers remotely by SSH and Web Interface.

As you can imagine if all the routers WAN addresses were in one subnet, the Vyatta would be unnecessary, but my decision was based on the need to be able to test load balancing, failover, and other scenarios in future.

In the following post I will discuss in details the configuration of each type of route. As a brief impression from the installation and configuration starting from the easiest to setup and going to the hardest ones.

PfSense have a live cd, and is a breeze to install and configure on x86 virtual machine.

Then is the Vyatta, also available on live cd that can be installed on virtual machine. For the configuration I have used the shell, only later to discover that there is a web interface that is somewhat helpful.

DD-WRT is hard to get on x86 virtual machine. I have opt out to find ready-made virtual machine and only to restore it to default configuration, and then to configure it to my preferences.

OpenWrt is even harder. On the forums the recommended way is to compile it for this architecture, and then install it. There is a wonderful tutorial here how to set it up on virtual box, but it does not work on VMware workstation. My guess is if you reconfigure the hard disk portions it will work. But yet again, my decision was to use ready-made virtual machine with the latest version, and configure it to my likings.

OpenWrt is even harder. On the forums the recommended way is to compile it for this architecture, and then install it. There is a wonderful tutorial here how to set it up on virtual box, but it does not work on VMware workstation. My guess is if you reconfigure the hard disk portions it will work. But yet again, my decision was to use ready-made virtual machine with the latest version, and configure it to my likings.

Posted in TechnicalTagged DD-WRT, Network, OpenWrt, pfSense, VMWare, Vyatta2 Comments

Asus RT-N16 supported with DD-WRT 100 pages thread

Posted on 10/03/2011 - 18/02/2019 by Stefan

One of the major sources of information about this model, and the supportability of different features was this topic.

Asus RT-N16 now supported

http://www.dd-wrt.com/phpBB2/viewtopic.php?t=61570&postdays=0&postorder=asc&start=0

Unfortunately as the last post states:

Murrkf: This thread is way too long to be practical. Outdated info is mixed with new info and few will read all 100 pages.

So you can,

SEE SUMMARY OF THIS THREAD AND CONTINUE DISCUSSION HERE:
http://www.dd-wrt.com/phpBB2/viewtopic.php?t=88118

Posted in TechnicalTagged ASUS, DD-WRT4 Comments

Upgrading DD-WRT Firmware on Asus RT-N16 with Optware Asterisk 1.4

Posted on 22/02/2011 - 18/02/2019 by Stefan

As you remember before almost a year, I’ve setup a SoHo PBX on my router. Now it is time to upgrade the firmware. Usually I perform update on monthly bases. But after such extensible configuration for the PBX, and couple of month stable work, no changes were required.

Good place to start is this topic: Firmware Recommendations – Still 14929 – 02/17/11

There are K26 firmware recommendations are for 15230, but I decide to use slightly newer build “dd-wrt.v24-15508_NEWD-2_K2.6_big.bin”
But then it hit me, if I have to do all the configuration to enable Optware and Asterisk again, this would cost me hours of configuration.

After searching through the Wiki pages and the forum, found some relevant information:
“
/opt backup
Now we have prepared /opt for adding more packages. We can also create backup of the whole /opt tree in case of router upgrade, to give preinstalled /opt to a friend or just safety backup. We will create such backup with
~ # tar czf /tmp/opt-backup.tar.gz /opt
Destination for /tmp/opt-backup.tar.gz should be large enough! Beware that /tmp is RAM. Destination should be disk or remote smbfs partition. Extracting /opt backup could be:
cd /
rm -rf opt/*
tar xvzf /tmp/opt-backup.tar.gz
If /opt space is tight and no packages requiring libstdc++ will be used (like Amule) then removing this large shared library is recommended
~ # rm /opt/lib/libstdc\*
will remove
/opt/lib/libstdc++.so /opt/lib/libstdc++.so.6 /opt/lib/libstdc++.so.6.0.8
ipkg-opt downloads packages into /opt directory and erases them after installing. If you have enough free RAM and /jffs only then adding –tmp-dir /tmp is recommended instead of default /opt
”

source: http://www.dd-wrt.com/wiki/index.php/Optware

and something more meaningful:

“ gobbledigook
DD-WRT User
Joined: 06 Apr 2009
Posts: 376
Posted: Tue Jul 20, 2010 10:55 pm Post subject:
if optware is installed to an external drive (usb) then when settings are reset all you need to do is enable usb support in services, and select the mount point as /opt/ apply and reboot
”
Check out the whole topic here: http://www.dd-wrt.com/phpBB2/viewtopic.php?p=464506

After reading this I’ve gain some confidence, and decide to upgrade.

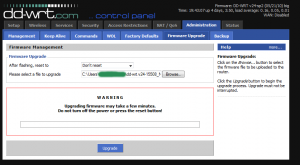
update_firmware_dd-wrt

And it was a success, no additional configuration was needed, Asterisk was up and running straight after the upgrade of the firmware.

Straight

Posted in TechnicalTagged Asterisk, ASUS, DD-WRT, VoIP1 Comment

SoHo PBX with DD-WRT and Asterisk 1.4

Posted on 24/07/2010 - 18/02/2019 by Stefan

Здравейте, от известно време изследвам една тема, а именно как да си направим телефонна централа за дома и малкия офис.

Първо си поиграх със Asterisk 1.4/1.6 на виртуална машина със soft phones.

Имах желание да изпробвам и с hard phones, въпроса беше коя марка и модел да избера. Тук на помощ дойде един от най – добрите сайтове, поне според мен за информация относно VoIP http://www.voip-info.org/. След продължително търсене на подходящи телефони съвместими с Asterisk, избрах Linksys SPA 941. Избрах го защото, не са ми необходими цветен екран, видеокамера, power over Ethernet, wireless и повече от 1, 2 линии.
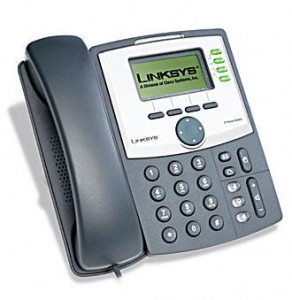
Тук може да видите повече информация за него: http://www.voip-info.org/wiki/view/SPA-941

За да добиете представа какви алтернативи има вижте новата гама на Cisco, тук има едно прилично ревю:

http://www.asterisktutorials.com/first-look-at-the-cisco-spa500-phones/

В един момент ми попадна брошура на JAR, и какво да видя в нея SPA 921/941 на доста приятни цени. Не се сдържах и си взех два. Все още са в каталога им като цената на 941 вече е 200 лева.

С помощ на този видео tutorial ги свързах с Asterisk-a за 10 минути.

http://www.asterisktutorials.com/linksys-spa941942-sip-phones/

Впоследствие ги flash-нах до последната версия на firmware-a, която в момента е 5.1.8. Става лесно и и бързо.

http://www.cisco.com/en/US/products/ps10038/index.html

От няколко години използвам OpenWRT и DD-WRT чудесни дистрибуции побираща се на безжични рутери. И двете предлагат уникални функции които са недостъпни от stock firmware-a на който и да е безжичен рутер.

На един етап започнаха да се появяват версии включващи и Asterisk. Реших да пробвам как ще се държи ако сложа и телефонната централа на устройство. Като се има предвид ползите от такава играчка, без движещи се части,  без шум и ниска консумация на електричество.

Разбира се тук е момента да спомена че е добре да се провери за съвместимост на модела със въпросната дистрибуция.

Ето тук за DD-WRT:

http://www.dd-wrt.com/wiki/index.php/Supported_Devices

и тук за OpenWRT

http://wiki.openwrt.org/toh/start

Като се замисля последните няколко безжични рутери които са ми попадали в ръцете не са издържали повече от 5 минути със stock firmware.

Като критерии за оценка на устройство може да се вземе Flash Memory. Това е памет на която се инсталира операционната система.  Тоест ако имате 4 MB не можете да сложите такава която изисква 8 MB, примерно. Правилото на Мечо Пух “Колкото повече, Толкова Повече” тук е валидно с пълна сила. Поради факта че ползвам големите build-ове на dd-wrt изискващи поне 8 MB си харесах Asus RT-N16. Той е със 128MB RAM, 32 MB Flash Memory,  a процесор му е на 480 MHz. Освен това има 2 USB 2.0 порта на които може да включи флашка, външен диск или принтер.
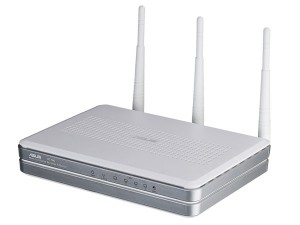
Незнам защо но този модел не се предлагаше в България доста време, въпреки че е излязъл още преди една – две години. Както и да е, от преди месец – два се предлага в Мост. Цената му е около 270 лева.

Последния hardware който ми беше необходим е един USB Flash Drive, или както ги наричаме флаш-ки. На него сложих Optware, за повече информация : http://en.wikipedia.org/wiki/Optware

Не можах да си намеря PQI Cool Drive U338 Pro която има доста прилични скорости и се задоволих с една PQI Cool Drive U339H, Titanium 4 GB за около 25 лева. Забелязвате ли как вече не пишат скоростите на read/write на флашките?

И така да видим разходите до тук:

Asus RT-N16 – 270 лв.

Linksys SPA 941 x2 – 350 лв.

PQI U339H, Titanium 4GB – 25 лв.

Общо: 645 лв.

Преди да пристъпя към инсталация и конфигурация прочетох тази тема във форума:

http://www.dd-wrt.com/phpBB2/viewtopic.php?t=43787&postdays=0&postorder=asc&start=0

GUI-то описано там не сработи и за мен, за това реших да рискувам с asterisk-gui, вместо него.

Да преминем към инсталацията:

Свалих последната налична версия от www.dd-wrt.com: dd-wrt.v24-14471_NEWD-2_K2.6_big.bin, вече има по – нови.

След това следвах този guide за да инсталирам и Optware:

http://www.dd-wrt.com/wiki/index.php/Optware%2C_the_Right_Way

и вече имам и този пакет

asterisk14 – 1.4.22.1-1 – Asterisk is an Open Source PBX and telephony toolkit.

След което добавих всички пакети със звуци използвайки ipkg-opt:

asterisk14-core-sounds-en-alaw – 1.4.8-1 – asterisk-core-sounds-en-alaw

asterisk14-core-sounds-en-g729 – 1.4.8-1 – asterisk-core-sounds-en-g729

asterisk14-core-sounds-en-gsm – 1.4.8-1 – asterisk-core-sounds-en-gsm

asterisk14-core-sounds-en-ulaw – 1.4.8-1 – asterisk-core-sounds-en-ulaw

asterisk14-extra-sounds-en-alaw – 1.4.7-1 – asterisk-extra-sounds-en-alaw

asterisk14-extra-sounds-en-g729 – 1.4.7-1 – asterisk-extra-sounds-en-g729

asterisk14-extra-sounds-en-gsm – 1.4.7-1 – asterisk-extra-sounds-en-gsm

asterisk14-extra-sounds-en-ulaw – 1.4.7-1 – asterisk-extra-sounds-en-ulaw

asterisk14-moh-freeplay-alaw – 0.0.0-1 – asterisk-moh-freeplay-alaw

asterisk14-moh-freeplay-g729 – 0.0.0-1 – asterisk-moh-freeplay-g729

asterisk14-moh-freeplay-gsm – 0.0.0-1 – asterisk-moh-freeplay-gsm

asterisk14-moh-freeplay-ulaw – 0.0.0-1 – asterisk-moh-freeplay-ulaw

и накрая добавих и GUI-то:

asterisk-gui – 2.0svn-r4045-1 – Asterisk-GUI is a framework for the creation of graphical interfaces for configuring

За да конфигурирам GUI-то използвах това упътване:

http://www.asteriskguru.com/tutorials/asterisk_gui.html

След като настроих Asterisk-a по мой вкус, вече имам няколко soft phone-a и двата SPA 941 свързани и работещи.

Това което ми липсваше на този момент е връзка със останалия свят.

Много добра тема по въпроса може да намерите тук:

http://www.kaldata.com/forums/index.php?showtopic=6681&st=0

ето и няколко упътвания:

http://akrozia.org/?tag=asterisk

http://ygeorgiev.net/archives/56

http://forum.spectrumnet.bg/showthread.php?t=2573

Накрая се насочих към BGOpen.

Регистрирах се, захраних сметката си с известна сума. И вече имам телефонен номер ала +3592490ХХХХ.

Прегледах няколко интересни статии по въпроса:

http://ygeorgiev.net/archives/56

http://forum.spectrumnet.bg/showthread.php?t=2573

Сега е необходимо да научим Asterisk-a за този номер, и как да го ползва.

Първо отиваме в Trunks, VOIP Trunks и избираме + New SIP/IAX Trunk

Избираме тип-а – SIP

Така и не успях да го подкарам с IAX, ако някой го е подкарал и има впечатления нека ги сподели.

За Hostname: sip.bgopen.net

Username / Password – каквито сте избрали при регистрация в bgopen.

Codecs: според FAQ-a на BGOpen

Можем да ползваме G.729, G.723.1, GSM, iLBC (поне един от изброените)

За CallerID и Enable Remote MWI не съм сигурен, за това ги оставих празни.

След това отидох в Outgoing Calling Rule, и създадох нов като Pattern: _9. – тоест всички номера които имат 9 от пред се насочват към създадения преди малко Trunk.

Избрах името което съм дал на Trunk-a в полето Use Trunk

Strip – 1 тоест да маха 9-тката при набиране на вън.

Редактирах DialPlan-a си да включва и Outgoing Calling Rule-a

Сега вече мога да набирам не само слушалките директно свързани към Asterisk, но и каквито ми хрумне навън. Единствено трябва да сложа една 9-ка пред номера.

Дойде време да могат и мен да ме търсят по новия ми номер +3592490ХХХХ.

За целта отидох в Incoming Calling Rules, създадох ново, като избрах

Trunk – който създадох по – горе

Time Interval – None

Pattern: _X. – да препраща всички номера към

Destination: Тук мога да избера номер или voice mail на някоя от слушалките. За тестове избрах един номер, но аз не искам това, а Voice Menus за да си създам IVR.

Вече имате входящи и изходящи обаждания и гласова поща.

Да нагласим Voice Menus

Създадох ново, избрах му name и extension

Тук трябва да се добавят Actions, действия които ще се извършват едно след друго.

Ето и моите:

Answer the call – все пак трябва да вдигнем на човека

Set(TIMEOUT(digit)=5) – колко време чакаме преди да спрем да чакаме за бутон

Set(TIMEOUT(response)=20) – колко време да чакаме за натискане на бутон

Play record/X & Listen for KeyPress events – пускаме на човека записано съобщение с инструкции коя цифра с кого ще го свърже, ако бъде натисната

Play record/Silance & Listen for KeyPress events – наложи се да направя втори запис, със тишина, за да дам време на обаждащия се да натисне някоя цифра, иначе веднага след приключването на предишния запис затваряше линията.

Hangup call – затваряме линията ако не е натисната цифра.

Тук имах див проблем с extension-a. В option има секция Extensions preferences в която за Voice Menus са заделени номера от 7000 до 7500. Проблема ми беше че ако избера в този диапазон не можех да набера номера, а ако се опитам да избера извън него не ми позволява. За това се наложи да го разширя до 8000 и сработи.

След това в Incoming Calling Rule само Destination полето се насочва към Voice Menu-то Extension-a който създадох.

Вече ако някой се обади на номера ми +3592490ХХХХ ще го посрещне записано съобщение което ще го информира кой номер да натисне за да се свърже с мен. Ако ме няма ще бъде насочен към гласовата ми поща, за да остави съобщение.

Какво следва

Когато намеря време и пари за това ми се иска да свържа и POTS към Asterisk-a. Тоест и

стария ми домашен телефонен номер от БТК да влезе в играта.

За целта ще ми е необходимо някакво устройство което да направи връзката.

Това устройство много ми харесва: CISCO SPA3102 2-Port Router with 1 FXO + 1 FXS

http://www.voip-info.org/wiki/view/Linksys-Cisco+3102

То може да свърши тази работа за мен.

Ето малко локална информация за него:

http://hardwarebg.com/forum/showthread.php?p=1780708

http://www.comelsoft.com/product.php?mf=cisco&lang=bul

Създаване на Phone Book, тоест входящите обаждания да се идентифицират по Caller ID, и да се изписва Име и номер на търсещия, не само номера му.

Последното нещо което трябва да пробва е да получавам факсове, по принцип услугата е активиране по подразбиране от bgopen, но никога да сега не съм я ползвал и незнам точно как работи. Както и ми е интересно какви възможности за изпращане на факсове имам.

Надявам се темата да ви е била полезна.
Posted in TechnicalTagged Asterisk, ASUS, DD-WRT, Linksys, Technical, VoIP3 Comments

Tags

ADDS AES-NI Asterisk ASUS Azure Captive Portal Cell Phone CentOS Certification Creative DD-WRT DNS Hyper-V LDAP Learning Linksys Microsoft Mikrotik RouterBoard RB250G Network OpenLDAP OpenVPN OpenWrt pfCenter pfSemse pfSense pfSense 2.0 RC1 pfSense 2.0 RC3 pfSense 2.2 PKI RADIUS Raspberry Pi Routing Site To Site Technical Uncategorized VLAN VMWare VoIP Vyatta Web Sites Windows Server 8 Windows Server 2008 R2 Windows Server 2012 R2 Wireless Workstation 8

Archives

  • April 2020
  • July 2019
  • May 2019
  • March 2019
  • February 2019
  • October 2018
  • August 2018
  • March 2016
  • April 2015
  • March 2015
  • January 2015
  • February 2012
  • October 2011
  • September 2011
  • August 2011
  • July 2011
  • June 2011
  • May 2011
  • April 2011
  • March 2011
  • February 2011
  • July 2010
Proudly powered by WordPress | Theme: micro, developed by DevriX.