
The easiest way to learn is by practice. This is especially true in IT. I have to lab out the migration from pfSense 1.2.3 to 2.0 RC1. Furthermore I have a site-to-site VPN setup that must be tested too.
I decided to expand my laboratory setup to house not just the two versions of pfSense, but DD-WRT and OpenWrt also. This will give me a opportunity to expand my test with alternatives. That is not enough, so let’s add two of each as virtual machines. Now we need a router in the middle to move the traffic between different subnets. Using any of the above will be redundant, so after browsing the VMware market for router appliance, as first option came Untangle, but I have already played around with it, and it is not appropriate for my purposes. As reasonable alternative is Vyatta. I had no experience with this appliance, and decide to check it out.
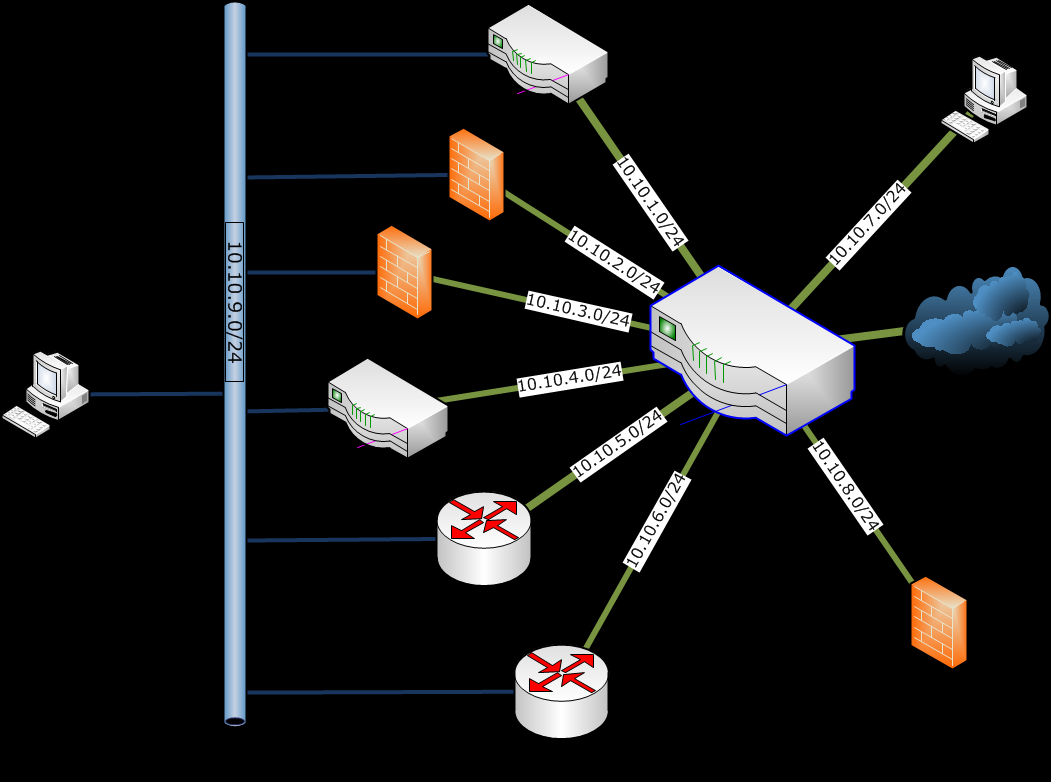
My finale network diagram looks like this:

The Console and Client are a simple Windows XP workstation from which to manage all the routers remotely by SSH and Web Interface.
As you can imagine if all the routers WAN addresses were in one sub-net, the Vyatta would be unnecessary, but my decision was based on the need to be able to test load balancing, fail over, and other scenarios in future.
In the following post I will discuss in details the configuration of each type of route. As a brief impression from the installation and configuration starting from the easiest to setup and going to the hardest ones.
PfSense have a Live CD, and is a breeze to install and configure on x86 virtual machine.
Then is the Vyatta, also available on Live CD that can be installed on virtual machine. For the configuration I have used the shell, only later to discover that there is a web interface that is somewhat helpful.
DD-WRT is hard to get on x86 virtual machine. I have opt out to find ready-made virtual machine and only to restore it to default configuration, and then to configure it to my preferences.
OpenWrt is even harder. On the forums the recommended way is to compile it for this architecture, and then install it. There is a wonderful tutorial here how to set it up on virtual box, but it does not work on VMware workstation. My guess is if you reconfigure the hard disk portions it will work. But yet again, my decision was to use ready-made virtual machine with the latest version, and configure it to my likings.
The easiest way to learn is by practice. This is especially true in IT. So now I have to lab out the migration from pfSense 1.2.3 to 2.0 RC1. Furthermore I have a site-to-site VPN setup that must be tested too.
I decided to expand my laboratory setup to house not just the two versions of pfSense, but DD-WRT and OpenWrt also. That is not enough, so let’s add two of each as virtual machines. Now we need a router in the middle to move the traffic between different subnets. Using any of the above will be redundant, so after browsing the VMware market for router appliance, as first option came Untangle, but I have already played around with it, and it is not appropriate for my purposes. As alternative to Untangle, Vyatta pop up from the result. I had no experience with this appliance, and decide to check it out.
My finale network diagram is like this:
The console and Client are a simple Windows XP workstation from which to manage all the routers remotely by SSH and Web Interface.
As you can imagine if all the routers WAN addresses were in one subnet, the Vyatta would be unnecessary, but my decision was based on the need to be able to test load balancing, failover, and other scenarios in future.
In the following post I will discuss in details the configuration of each type of route. Now let’s go from the fore a brief impression from the installation and configuration starting from the easiest to setup and going to the hardest ones.
PfSense have a live cd, and is a breeze to install and configure on x86 virtual machine. The only interesting this here is how to publish the web interface and the SSH on the WAN.
Then is the Vyatta, also available on live cd that can be installed on virtual machine. For the configuration I have used the shell, only later to discover that there is a web interface that is somewhat helpful.
DD-WRT is hard to get on x86 virtual machine. I have opt out to find ready-made virtual machine and only to restore it to default configuration, and then to configure it to my preferences.
The easiest way to learn is by practice. This is especially true in IT. I have to lab out the migration from pfSense 1.2.3 to 2.0 RC1. Furthermore I have a site-to-site VPN setup that must be tested too.
I decided to expand my laboratory setup to house not just the two versions of pfSense, but DD-WRT and OpenWrt also. This will give me a opportunity to expand my test with alternatives. That is not enough, so let’s add two of each as virtual machines. Now we need a router in the middle to move the traffic between different subnets. Using any of the above will be redundant, so after browsing the VMware market for router appliance, as first option came Untangle, but I have already played around with it, and it is not appropriate for my purposes. As reasonable alternative is Vyatta. I had no experience with this appliance, and decide to check it out.
My finale network diagram looks like this:
The Console and Client are a simple Windows XP workstation from which to manage all the routers remotely by SSH and Web Interface.
As you can imagine if all the routers WAN addresses were in one subnet, the Vyatta would be unnecessary, but my decision was based on the need to be able to test load balancing, failover, and other scenarios in future.
In the following post I will discuss in details the configuration of each type of route. As a brief impression from the installation and configuration starting from the easiest to setup and going to the hardest ones.
PfSense have a live cd, and is a breeze to install and configure on x86 virtual machine.
Then is the Vyatta, also available on live cd that can be installed on virtual machine. For the configuration I have used the shell, only later to discover that there is a web interface that is somewhat helpful.
DD-WRT is hard to get on x86 virtual machine. I have opt out to find ready-made virtual machine and only to restore it to default configuration, and then to configure it to my preferences.
OpenWrt is even harder. On the forums the recommended way is to compile it for this architecture, and then install it. There is a wonderful tutorial here how to set it up on virtual box, but it does not work on VMware workstation. My guess is if you reconfigure the hard disk portions it will work. But yet again, my decision was to use ready-made virtual machine with the latest version, and configure it to my likings.
OpenWrt is even harder. On the forums the recommended way is to compile it for this architecture, and then install it. There is a wonderful tutorial here how to set it up on virtual box, but it does not work on VMware workstation. My guess is if you reconfigure the hard disk portions it will work. But yet again, my decision was to use ready-made virtual machine with the latest version, and configure it to my likings.
You can install OpenWrt onto VMWare easily following the video instruction on Youtube about install OpenWrt on VirtualBox, “http://www.youtube.com/watch?v=cL81DQk4WL8”, but make sure you change the HDD option to IDE. Here’s a little instruction I composed for myself just in case I need to redo:
These are the steps taken to configure the four virtual OpenWrt Backfire 10.03.1-rc6, each with three separate ethernet connection.
Steps:
1. Virtual machine specs
-1GB IDE HDD (Note: using SCSI HDD will not work)
-128MB RAM
-1 NAT network adapter
-2 Custom VMNet adapters (will have to play around later to get them to connect to each other)
2. Follow the video on http://www.youtube.com for installing “OpenWrt Backfire VirtualBox Install”
Steps:
1. Bootup with Ubuntu iso image (use the “try Ubuntu” option)
2. Open Firefox or any browser
3. Goto http://www.openwrt.org and copy the Link Location for the openwrt-x86-generic-combined-ext2.img.gz file
4. Open Terminal
5. switch to root: sudo -s
6. fdisk /dev/sda (to format the HDD)
a. use options “o” then “w” pressing Enter after each
7. fdisk -l (list disk)
8. wget (paste the link for the OpenWrt image here)
9. gunzip (the image filename downloaded from the previous step)
10. dd if=(unzip filename of OpenWrt) of=/dev/sda bs=1M count=100
11. reboot
12. vi /etc/config/network (make change to the following/delete the other options for this connection)
-config interface lan
option ifname eth0
option proto dhcp
option hostname backfire
13. /etc/init.d/network restart (restart network connections/adapters)
14. ping http://www.google.com (should get reply from google)
15. opkg update
16. opkg install fdisk
17. fdisk -l
18. mkdir boot
19. mount /dev/sda1 boot/
20. cd boot/
21. cd boot/grub
22. vim menu.lst
23. delete first two lines (begin with serial and terminal) and change timeout to 0
24. save and reboot
Happy sharing.
Kelxon