Skip to content

Stefcho's Tech Blog

Software Development, Cloud, DevOps and PfSense

Month: May 2011

pfSense-On-A-Stick – 802.1Q Trunking With pfSense 2.0 RC1 and Mikrotik RouterBoard RB250G Smart Gigabit Switch with five ports and SwOS v1.5

Posted on 25/05/2011 - 18/02/2019 by Stefan


I’ve just got a Mikrotik RouterBoard RB250G. While searching for useful information about its capabilities found very interesting article in the MikroTik Wiki: SwOS/Router-On-A-Stick

This article gave me the idea to use pfSense as a router and trunk a few VLANs.

Scenario

My aim is to reproduce the configuration from the above mentioned post with three VLANs, trunked on a single LAN interface (aka Parent interface) to the pfSense. To make it more usable, every VLAN will be on separate port on the switch (aka Access Port) and have its own instance of DHCP running on the pfSense. In this way, when a client connect to some of the ports he/she will automatically receive configuration contextual to VLAN on this port.

For the installation and basic configuration of pfSense on VMware take a look my previous post Install pfSense 2.0 RC1 on VMWare Workstation 7

The difference here is that the LAN virtual NIC is bridged to the second physical NIC of my workstation and from there directly connected to the RB250G switch.

We start with installed pfSense 2.0 RC1, configure WAN port bridged to my first physical NIC, and LAN port connected to my second physical NIC. For the sake of convenience and because of the problems that I faced initially with the communication on my second NIC, I decide to manage the router through the WAN interface, because its configuration will not change during testing. More on the topic VMware Workstation Virtual Machine and VLANs support, you can find at the bottom of this post.

There are two ways to configure VLANs in pfSense as long as I’m aware. One is through the console and the other is using the Web GUI. Here I will use the latter.

WAN Rules

First let’s configure Rules on the WAN port to allow access to the Web GUI.

Got to Firewall > Rules, on the WAN leaf, add new rule.

The Interface is WAN, Protocol is TCP. Destination port range is HTTPS, enter and description.

This will allow access to the pfSense WebGUI on the WAN IP Address.

Creation of VLANs and Interfaces

Go to Interfaces> (assign).

Make sure that you second Network port is not assigned to any Interface, if it is removed it. In my case this is em1. This machine has two interface em0 for the WAN, and em1 for the LAN.

Go to the VLANs leaf, click on the add button.

On the new page make sure that Parent interface is em1. Enter VLAN tag number different from 1.

I’ve made three VLANs – 100, 200, 300.

Now we need to assign these as Interfaces, go to Interface assignments and then add them one by one, select the proper Network port which are the VLANs that we have just created, and do not assign em1 to any Interface directly.

Now select LAN interface from the drop down menu under Interfaces. Tick Enable Interface, as type select Static. Under Static IP configuration, enter IP address and subnet mask.

In my case it is 10.10.10.1/24.


Repeat this procedure for all the VLAN interfaces. For reference these are the IP addresses that I have used:

LAN – 10.10.10.1/24

OPT1 – 10.10.9.1/24

OPT2 – 10.10.8.1/24


Interfaces Rules

For the sake of simplicity every interface will be allowed communication to everywhere.

Go to Firewall > Rules, on the LAN leaf.

Add new Rule

Action is Pass, Interface is LAN, Protocol in Any, Source is Any, Destination is Any, enter some Description too.

Repeat this step on OPT1 and OPT2 leafs too.


DHCP Server Configuration

Go to Services > DHCP Server page.

On the LAN leaf, tick Enable DHCP server on LAN interface.

Enter Range from the subnet of the interface, in my case 10.10.10.10 – 10.10.10.15

Click the Save button.

Repeat the procedure for the OPT1 and OPT2 leafs. In my case the ranges were.

LAN – 10.10.10.10 – 10.10.10.15

OPT1 – 10.10.9.10 – 10.10.9.15

OPT2 – 10.10.8.10 – 10.10.8.15


Mikrotik RouterBoard RB250G Smart Gigabit Switch with five ports and SwOS v1.5

Before configuring VLANs on the switch, make sure that your firmware version is 1.2 or higher, by the time of writing this version 1.5 of the firmware is available. Otherwise you may run into problems that are related to applied functionality of the device.

Switch VLANs Configuration

On the Switch, go to the VLANs leaf, add the same VLANs from the router. As for ports member always add Port1 and choose one of the other ports. This is the tricky part, my pfSense router is connected to Port1, which makes it Trunk port and must be a member of all VLANs.

In my example

Port 5 is member of VLAN 100

Port 4 is member of VLAN 200

Port 3 is member of VLAN 300

On the VLAN leaf.

For Port 1, our Trunk Port – VLAN Mode is Enabled, default VLAN ID is 1 and VLAN Header is Add If Missing.

For the other Access Ports the configuration is as follows: VLAN Mode is Strict, Default VLAN ID is configured by your design, from the VLANs configured on the router. You can leave Force VLAN ID unpicked, VLAN Header is Always Strip.

Testing

Now if you plug the test laptop to one of the Ports 3,4,5. And the NIC is configured to receive configuration from a DHCP server, you will get IP address from the subnet of the configured VLAN range. Because of the Allow All traffic rule you will have Internet, and access to host on the other VLANs.


Issues

Some issues that I faced along the way.

VMware Workstation Virtual Machine and VLANs support

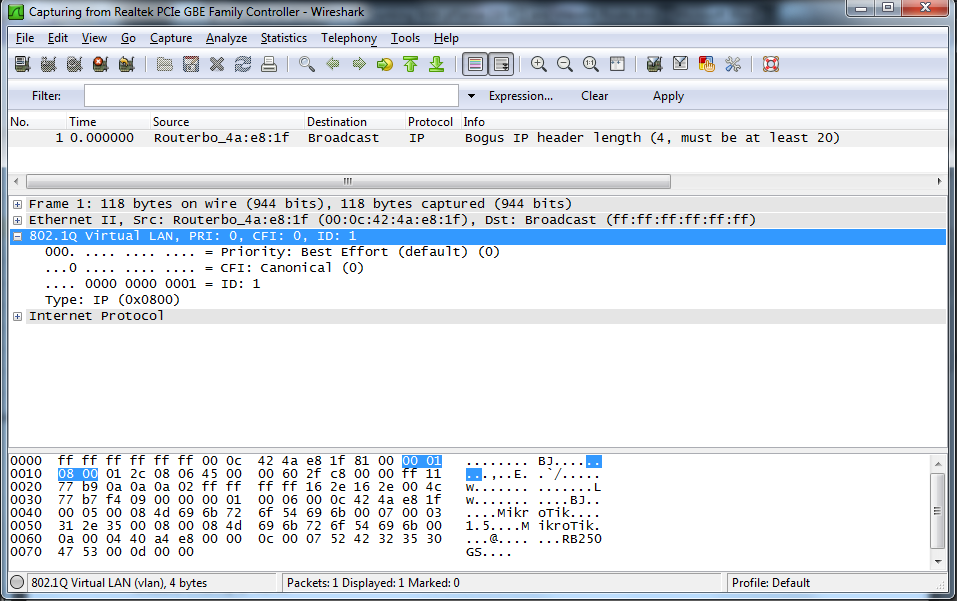
My idea was to configure quickly one VM with pfSense, and use the bridged interface for connection to the switch. Everything works fine up until I configured VLANs. Then suddenly the communication between the route and switch stops. After a little network sniffing what surprised me, was that the packets were not tagged with VLANs. After extensive googling on the topic, I did not found definitive reason for this strange behaviour. One part of the information was related to the physical NIC support of VLANs. The other portion of the topics were about the VMware VM and the type of the virtual NIC configured on the virtual machine. Unfortunately my EVGA X58 motherboard is equipped with two on-board Realtek NICS, but fortunately enough they support VLAN and event Priority. When I check the configuration of the bridged NIC Priority & VLAN were Enabled.

The troubleshooting took me long hours, but finally I’ve got a great idea. What if I turn off the Priority & VLAN support on the physical NIC? And indeed, packets start showing with the 802.1Q Tags. My suspicion is that the physical NIC strips off the VLAN tag, and this is the cause of the disruption in communication between my router and switch.

Mikrotik RouterBoard RB250G

If you ping the switch the pings are around 17-9 ms, which is huge taking in to account the device is directly connected.

For more information look here:

Pings TO the switch dropped, high ping…


References:

  • To get a feeling of the switch Web GUI, take a look here, all interface pages are shown and all options are explained : http://wiki.mikrotik.com/wiki/SwOS
  • This wiki article gave me some ideas for VLANs configuration: http://wiki.mikrotik.com/wiki/Manual:Interface/VLAN
  • I like this thread in the forum, probably in future will try to separate Voice and Data in to separate VLANs as discussed: Topic: Setting UP VLAN in pfSense 2.0?  http://forum.pfsense.org/index.php?topic=34739.0
  • If you are seeking for a Smart Switch take a look at that thread: Smart Switch – Recommendations

MikroTik Forum useful links:

The Section about Mikrotik RouterBoard RB250G:

SwOS

Some interesting threads:

please do not tag default vlan in “add if missing” mode

VLAN Tagging on SwOS

VLAN Trunk

Vlan Trunk / Access port configuration

QnQ

Posted in TechnicalTagged Mikrotik RouterBoard RB250G, Network, pfSense, VLAN4 Comments

Packt Publishing OpenVPN 2 Cookbook Review

Posted on 22/05/2011 - 28/10/2018 by Stefan

OpenVPN 2 Cookbook

100 simple and incredibly effective recipes for harnessing the power of the OpenVPN 2 network
By Jan Just Keijser

OpenVPN 2 Cookbook

Introduction

I was approached by Packt Publishing representative, asking if I would be willing to make a review of this book. This was interesting because at that moment I was reading pfSense 2.0 Cookbook from the same publishing company. I was generously provided with the book, and here we are a month later.

The OpenVPN 2 Cookbook main subject is the use of OpenVPN in different scenarios. Its aim is to help you along the way of implementing an OpenVPN solution. For more detail description take a look at the detailed description Here.

My experience with OpenVPN is based on three years of different deployments. You can find more details at the bottom of this post.

What’s the book about?

The book is an in depth examination of OpenVPN and how to use is in your every work. If you are in a hurry you can find a quick fix in the huge amount of recipes, or read it from cover to cover and get extensive knowledge of OpenVPN, its capabilities and different usage scenarios.

The book states that prior knowledge and experience of system administration, TCP/IP is required, also in OpenVPN installation. The examples in the book are made mostly on Linux based systems, so prior knowledge in the field is required too.  If you are fresh to field, probably first step is to take a look at Beginning OpenVPN 2.0.9 and then continue with this book.

As the cover states: Quick answers to common problems.

The book is structured in twelve chapters, and each chapter consists of about eight to ten sub topics that are called recipes. These recipes are like short How Tos for a particular case. The valuable thing is that throughout the chapter the recipes build on each other, starting from very basic configuration to more advanced ones. To get an impression you can take a look at the Table of Contents.

Every recipe has a How it works sections. They are extremely useful to understand what and how is happening behind the scenes. And that’s not all, after this section additional value is provided in the There’s more sections, where additional explanations and further developments are delivered.

Does it achieve its promises?

The first topic that really gets me going was 3-way routing in the first chapter. I was planning to implement this for small number of fixed endpoints which are less than four. For more you have to read further in the book.

The next this that surprise me pleasantly was the PKI, Certificates and OpenSSL chapter. It helped me better understand OpenSSL and give me better idea how to manage certificates. This topic continues in the next chapters about Two-factor Authentication. I was very surprised to see that even hardware tokens can be used to authenticate users.

In The Scripting and Plugins, there is a very important secret about scripts execution, which was not known to me, and definitely will help me in future.

The Troubleshooting sections can save you precious blood, sweat and tears especially with problems related to Routing. Those are the two chapters I appreciate the most because they provide you with analytical way to diagnose and eliminate problems in deployments. You can have a peek in the sample chapter here: Troubleshooting OpenVPN: Configurations

Logically after you have fixed all the problems a Performance Tuning is your next step.

The following two chapters are related to OS integrations and advanced configuration. They help me better understand how to better integrate OpenVPN with the unique environment of the client.

The last chapter is all about the new features in 2.2 version of OpenVPN. It is quite useful to have a well arranged section with new features that you might have not known existed up until now.

Conclusion

I really like reading this book, and the systematic knowledge that it provides. Whether you are a full time System Administrator or just a part time occupied with the IT in your company, or just wants to establish a secure connection to your home this book will definitely give you the needed advices how to get there.

Biography

My experience with OpenVPN is based on three years’ of deployments.  My first deployment was on OpenWRT where I had to use predominantly command line to configure it and Secure copy (SCP) for certificate transfer, then on DD-WRT where most of the work is done through the Web GUI, with exemption for more advanced configuration that have to be placed in start-up scripts. After that on I used Windows based systems as clients and servers, and lately as you can see from my blog I’m working with pfSense.

Posted in TechnicalTagged Network, OpenVPN, pfSense, PKI, Site To Site, Technical1 Comment

pfSense 2.0 RC1 on VMware Workstation 7.1.4 – RAM size

Posted on 15/05/2011 - 18/02/2019 by Stefan

In this post, I’ve recorded a quick video about how to configure a VM for pfSense 2.0 RC1. In this clip the VM RAM size was 256. For testing purposes I usually ought to use 128 the minimum amount.

During the first boot of the system, the following Warning message pops up. There is no enough memory.

So my recommendation is to set this parameter to minimum 156 MB for RAM.

Doing so Will provide the system with 130 MB RAM.

Hope this help.

Posted in TechnicalTagged pfSense, VMWare2 Comments

Building Site to Site Connection with OpenVPN on pfSense 2.0 RC1 with PKI

Posted on 11/05/2011 - 18/02/2019 by Stefan

In the last post we’ve setup a Site To Site with Shared Key, now instead we will use internal Certificate Authority. Honestly speaking if I did not follow this guide, there was no routing between the two sites.
OpenVPN Site-to-Site PKI (SSL)

For reference here is the network diagram:

pfsense01 will be out OpenVPN server, and pfsense02 will be our OpenVPN client. Client and Server are just host on the two LANs behind routers.

On pfsense01 go to System > Cert Manager, On CAs leaf create new Certificate Authority.

Enter Descriptive Name, choose as a method Create an internal Certificate Authority, leave Key length and Lifetime to defaults.

Fill in the rest of the fields.

Then go to Certificates leaf, add new and create the server certificate.

Enter descriptive name, I’ve used the router host name, as a method choose Create an internal Certificate.

Verify that for Certificate authority the CA that we have created in the previous step is selected. Leave the rest of the fields to default, with exception of Common Name, here enter the host name of the server, in my case it was pfsense01.

Now go to System > User manager, create new user. For the sake of simplicity for username I’ve used the host name of the second router, pfsense02. Enter Password, for Full name I’ve used again the router name. Then tick the Click to create a user certificate.

For descriptive name use the host name of the router, this is the Common Name of the certificate and it is important to match.

Instead of creating new user, you can create new Certificate directly.

Go to Cert Manager, on the Certificate leaf add new. Again as Descriptive name and Common Name use the host name of the second router, in my case pfsense02.

Go to VPN > OpenVPN on the Server leaf, add new.

As Server Mode select Peer to Peer (SSL/TLS). As protocol UDP, Device Mode is TUN, Interface is WAN, leave the port to default 1194. Enter Description, Tick Enable authentication of TLS packets and Automatic generation a shared TLS authentication key.

As Peer Certificate Authority select the CA that we have created in the beginning. I did not have a Peer Certification Revocation List so leave it to None. Select the Server Certificate that we have created. For DH Parameters Length you can leave it to the default 1024 bits. Choose Encryption algorithm in my case BF-CBC (128-bit), take note of the algorithm we have to use the same on the client too.

As Tunnel Network choose one different from your LANs, in my case the default 10.0.8.0/24. Enter the Local Network, in my case 10.10.9.0/24. Enter the Remote Network in my case 10.10.10.0/24. Leave the rest to defaults.

Go to VPN > OpenVPN in Client Specific Overrides, and add new entry for the client.

For Common name enter the host name of the second router that we have used as common name in the certificate, in my case pfsense02. Enter some description, and the Tunnel Network, in my case 10.0.8.0/24. Leave the rest to default.

In the Advanced form, enter

iroute 10.10.10.0 255.255.255.0

Without this step there will be no routing between the two LANs.

Got to Firewall >Rules and on the OpenVPN leaf, add new rule.

Here for testing purposes I’ve made allow all rule. Select any as Protocol, leave the rest to default and enter description.

For the client to be able to connect, let’s open the OpenVPN Server port.

In Firewall > Rules on the WAN leaf, add new rule. Select UDP as Protocol.

As Destination port Range in our case select OpenVPN.

Now it is time to export certificate for use on the second router.

Go back to System > Cert manager export public and private CA certs, click on the first downward pointing triangle. As a guide, when you hoover over it the text label is Export CA.

Then go to User Manager, enter the configuration of our user pfsense02, in the User Certificates section click on both downward pointing triangles to download both cert and key.


Now on pfSense02, go to System > Cert Manager on CAs leaf, add new one.

And as Method select Import an existing Certificate Authority. Enter as Descriptive name the name of the certificate from the first server, in my case pfsense01.

You have to have opened the certificate with notepad, or another text editor. Then simply copy / paste the content of the file.

Now on the Certificate leaf do the same but paste and the content of the  *.key in Private key data. Again enter Descriptive name as the one from the first router.

Go to VPN > OpenVPN in Client leaf and add new

As Server Mode select Peer to Peer (SSL/TLS), Protocol is UDP, Device mode is TUN, and Interface is WAN. For Server host or address enter the WAN IP of pfsense01, in my case 10.10.2.2 and enter the port. Put some Description.

Open the Server configuration (VPN > OpenVPN > Server leaf) on pfsense01, copy the TLS Authentication.

Paste it in the TLS Authentication form on our client configuration on pfsense02. Unpick Automatically generate a shared TLS authentication key and leave Enable authentication of TLS packets.

Use the same Tunnel Network as on the server, in my case 10.0.8.0/24. Enter Remote Network, this is the network behind pfsense01, for this case 10.10.9.0/24.

Add Allow All rule in Firewall > Rules on the OpenVPN leaf.

Now go to Status > OpenVPN and you should see that the connection is established.

From the Server prospective, again on Status > OpenVPN.

Now you should be able to access hosts from the other network successfully.


Posted in TechnicalTagged Network, OpenVPN, pfSense, PKI, Site To Site10 Comments

Building Site to Site Connection with OpenVPN on pfSense 2.0 RC1 with Shared Key

Posted on 02/05/2011 - 18/02/2019 by Stefan


Sooner or later you will have two or more geographically distant LAN that you want to connect together. Whether we are speaking about to branch offices or home and office, or simply your office LAN and some co located servers in a data center, it is only a matter of time before you need such solution.

In this case we will use two pfSense 2.0 RC1, one in each remote location.

The map shows our lab setup for the purpose.

In this post we will use Shared Key as a way to authenticate the two routers.

On pfSense01, this machine will play the role of server in this scenario.

Go to VPN > OpenVPN, on the Server leaf, add new one

As Server Mode choose Peer to Peer (Shared key)

Protocol, Device Mode, Interface, Local port – you can leaf the default for now.

Description – Enter whatever is informative for you.

Encryption algorithm, choose one by your preference, keep in mind that different algorithms have different load on the server. I use BF-CBC (128-bit)


Choose different from both of your LAN subnets for Tunnel Network, in our case 10.0.8.0/24.

Local Network – The LAN behind the pfSense01, in this example 10.10.9.0/24.

Remote Network – this is the LAN behind the pfSense02, as on the diagram 10.10.10.0/24.

Click on Save button and we are Done.

Open the newly configured server and copy the Shared Key. We will need it for the setup of pfSense02.

Go to Firewall > Rules, on the WAN leaf, add new rule

The Action is Pass, Select WAN as Interface, UDP as Protocol.

For Destination port range, select OpenVPN in our case it is 1194, if you have used some other port in the configuration enter it here. Enter some description also.

Go to the OpenVPN leaf. Here I have made a very basic Allow All rule. If you have some security concerns, or want to limit the communication between the two sites, make one or more rules to fit your need.


pfSense02 will play the role of client.

Go to VPN > OpenVPN, on the Client leaf, add new one

As Server Mode choose Peer to Peer (Shared key)

Protocol, match the one from the server in our case UDP, Device mode – tun, Interface is WAN, Local port, leave empty for random, or enter manually one if you want.

Server host or address, enter the WAN IP address on the first router pfSense01, in our case 10.10.2.2. Server port, whatever port you have used on the server, in our case the default 1194.

Enter Description. For Shared Key, paste the one from the pfSense01 here. Encryption algorithm, duplicate the one from the first configuration, in our case BF-CBC (128-bit).

Tunnel Network, duplicate the one from the server. Remote Network is the LAN network behind the pfSense01, for our example 10.10.9.0/24.

Leave the rest to default, and Save the configuration.

Again add a rule on the OpenVPN leaf in the Firewall > Rules section to allow traffic flow between the two sites. Here again I’ve setup a rule that Allow All traffic between the two sites.

Now go to Status > OpenVPN. You should see that Status equals UP.

Now you should be able to successfully communicate with hosts from the other network.

Posted in TechnicalTagged Network, OpenVPN, pfSense, Site To Site11 Comments

Tags

ADDS AES-NI Asterisk ASUS Azure Captive Portal Cell Phone CentOS Certification Creative DD-WRT DNS Hyper-V LDAP Learning Linksys Microsoft Mikrotik RouterBoard RB250G Network OpenLDAP OpenVPN OpenWrt pfCenter pfSemse pfSense pfSense 2.0 RC1 pfSense 2.0 RC3 pfSense 2.2 PKI RADIUS Raspberry Pi Routing Site To Site Technical Uncategorized VLAN VMWare VoIP Vyatta Web Sites Windows Server 8 Windows Server 2008 R2 Windows Server 2012 R2 Wireless Workstation 8

Archives

  • April 2020
  • July 2019
  • May 2019
  • March 2019
  • February 2019
  • October 2018
  • August 2018
  • March 2016
  • April 2015
  • March 2015
  • January 2015
  • February 2012
  • October 2011
  • September 2011
  • August 2011
  • July 2011
  • June 2011
  • May 2011
  • April 2011
  • March 2011
  • February 2011
  • July 2010
Proudly powered by WordPress | Theme: micro, developed by DevriX.