Skip to content

Stefcho's Tech Blog

Software Development, Cloud, DevOps and PfSense

Month: April 2011

OpenVPN with RADIUS authentication on pfSense 2.0 RC1

Posted on 26/04/2011 - 18/02/2019 by Stefan

This is the last post in the series of authentication alternatives for OpenVPN in pfSense 2.0 RC1.

In the previous posts we looked at the local database of pfSense and Active Directory. Now we will use Remote Authentication Dial In User Service (RADIUS) instead. Again we will authenticate our users against Active Directory, as domain user accounts.

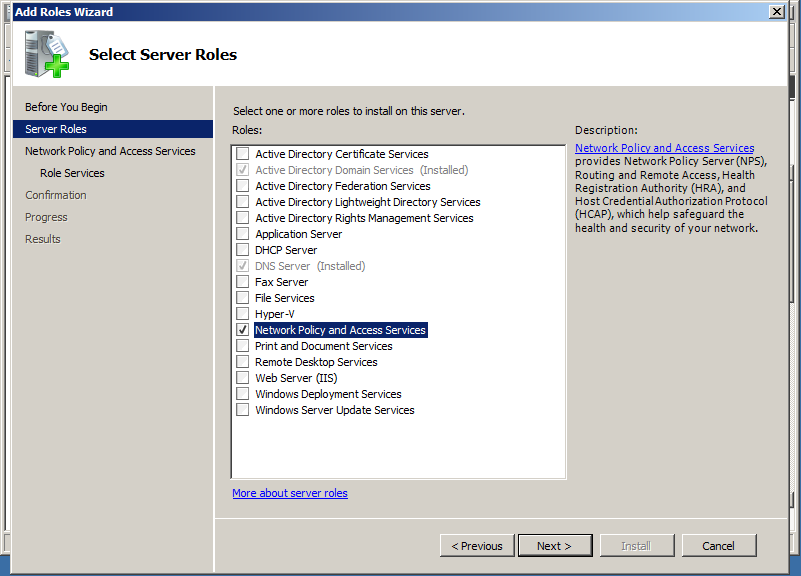
For that purpose we need to add Network Policy and Access Services server role to our Windows Server 2008 R2.

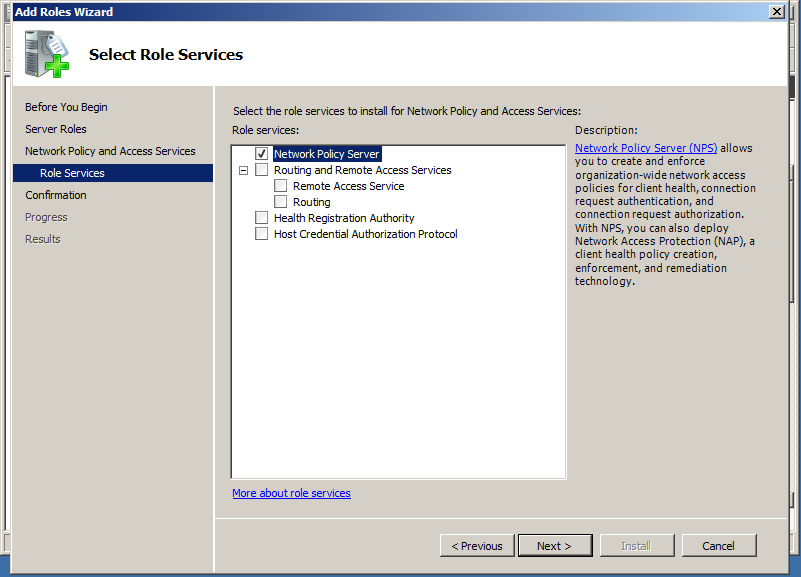
From the Role services select only the Network Policy Server. We don’t need any of the other services.

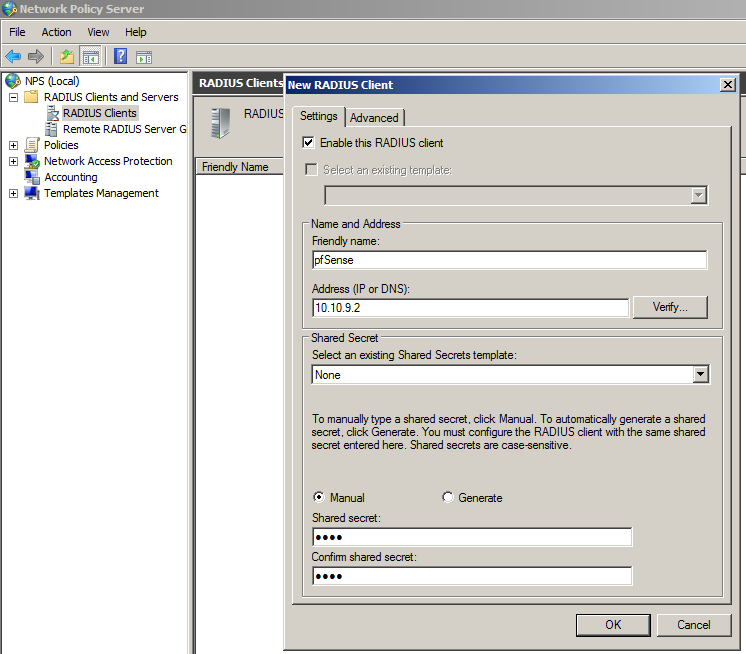
After the successful installation, open the Network Policy Server console. Under RADIUS Clients and Servers, create new RADIUS Client.

Take note of the Friendly name of the client, we will use is later in the Network Policy. In our case pfSense.

Enter the LAN address of pfSense, and Shared secret.

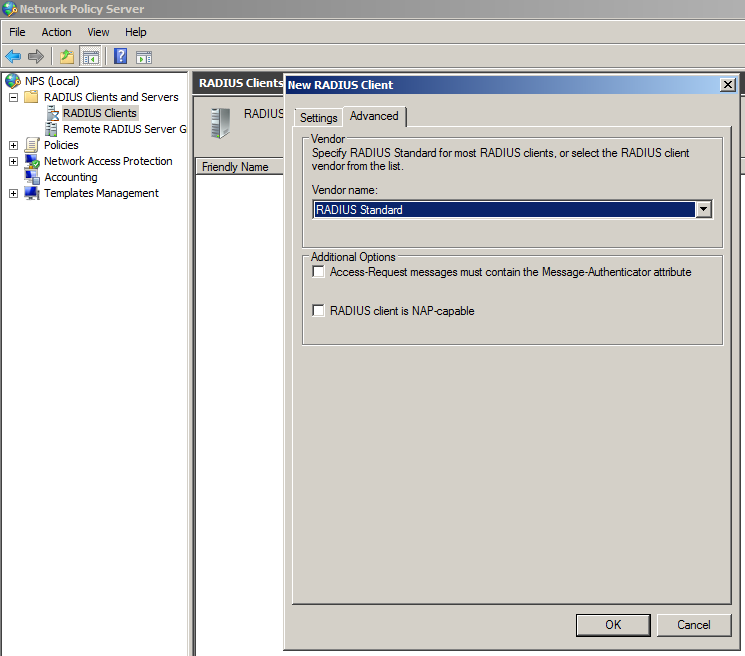
Leave the default configuration on the Advanced leaf.

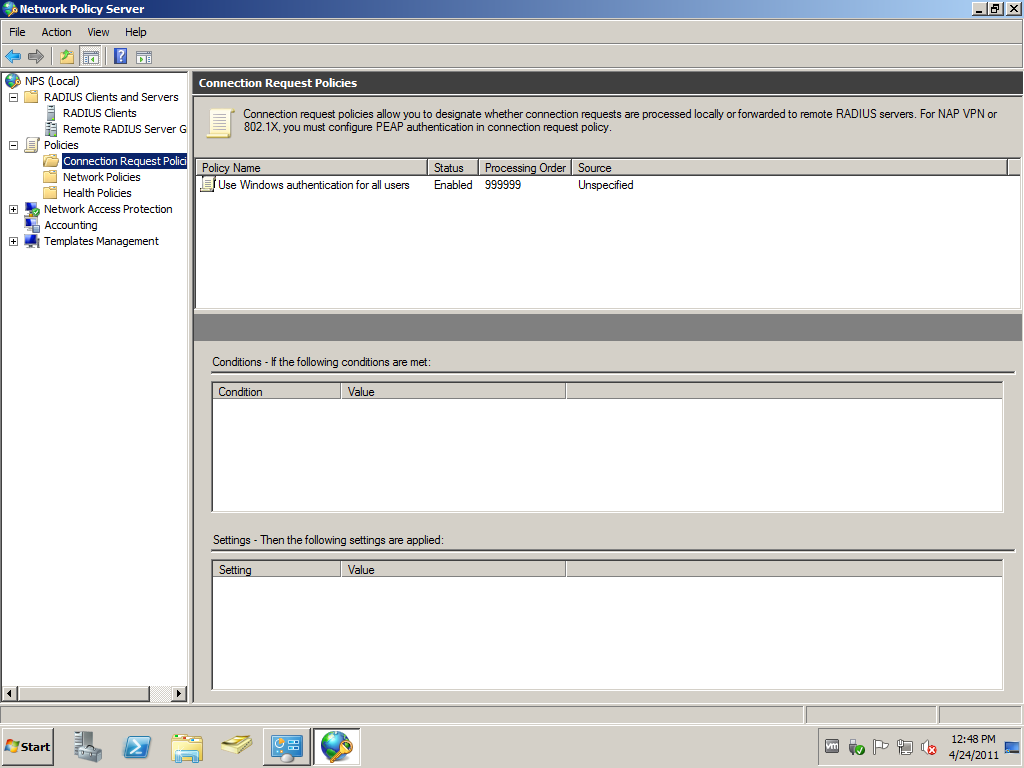
We won’t configure additional Connection request Polies.

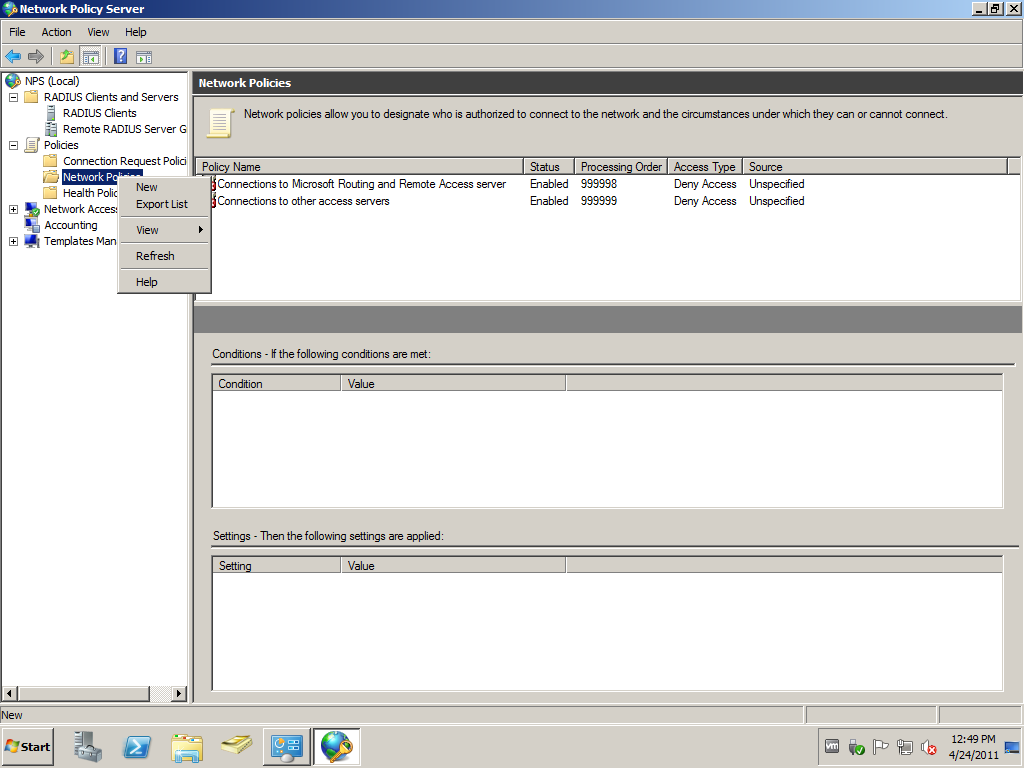
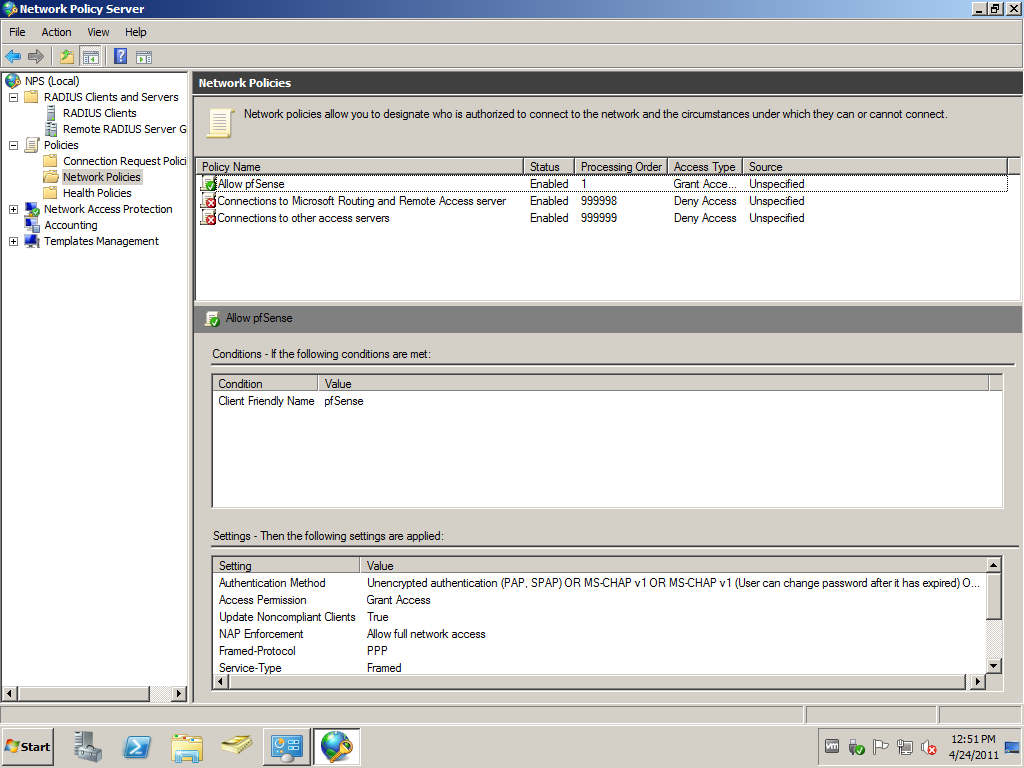
A new Network Policy is needed, because the default Connections to other access servers block requests send by pfSense.

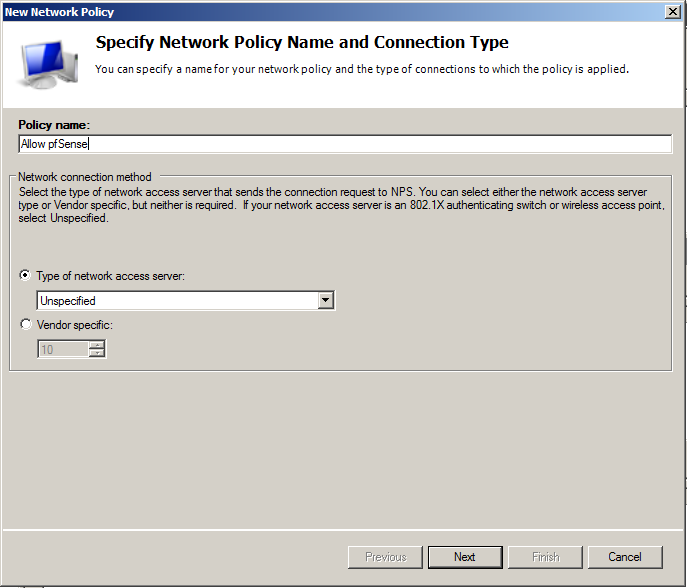
Enter Policy name of your preference, and leave the default Type of network access server to Unspecified. Otherwise your authentication request will be denied.
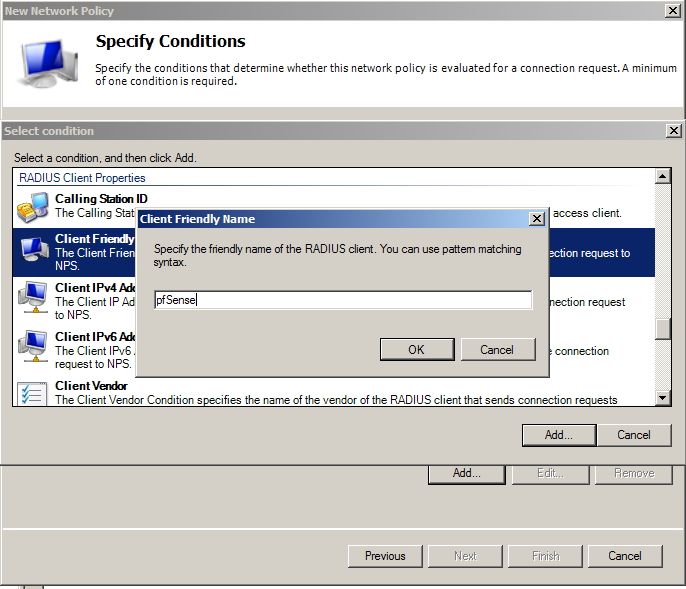
For Condition, let’s add the Client Friendly Name. In our case the client is our pfSense router. Type in here the Friendly name that you used in the RADIUS Client configuration. In our case pfSense.

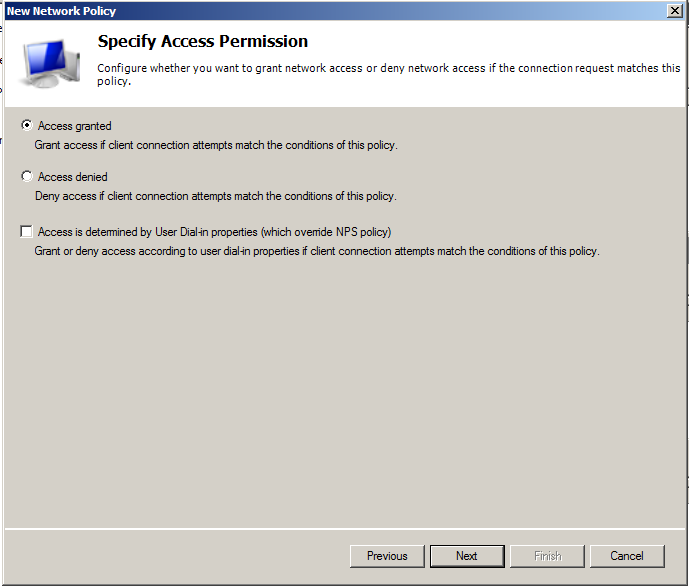
On Specify Access Permission, leave Access granted.

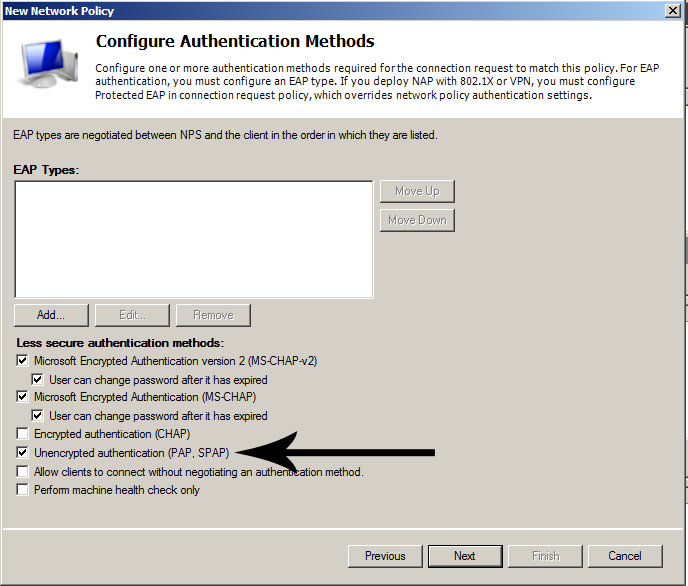
As Authentication Methods add Unencrypted authentication (PAP, SPAP). The explanation follows later.
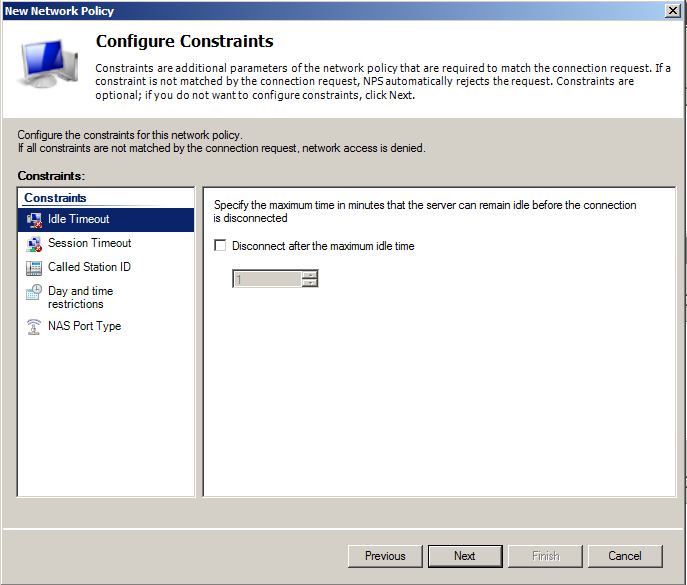
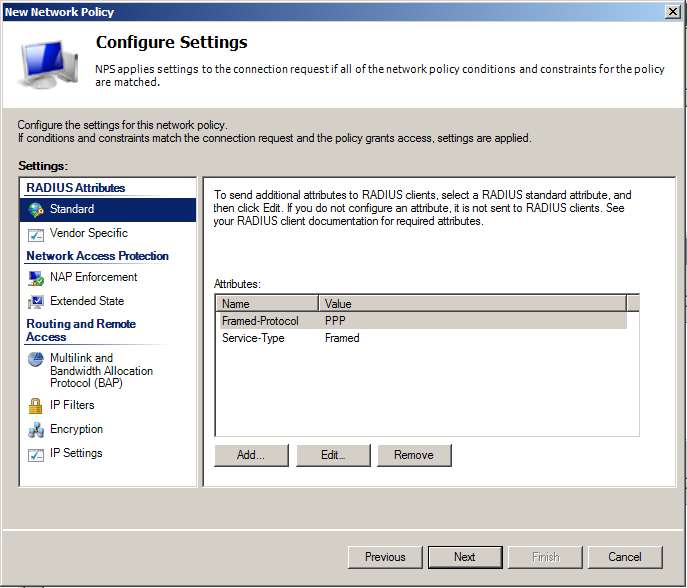
Leave constraints to defaults, if you don’t have some specific requirements. The same is valid for Settings too.

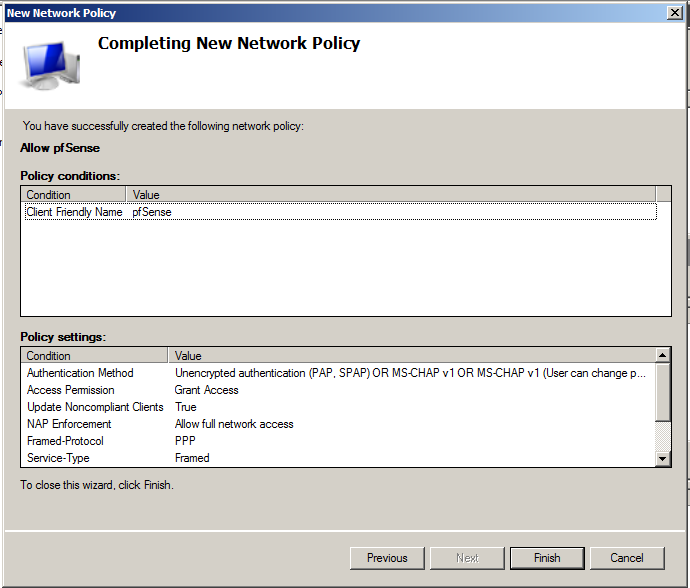
All done

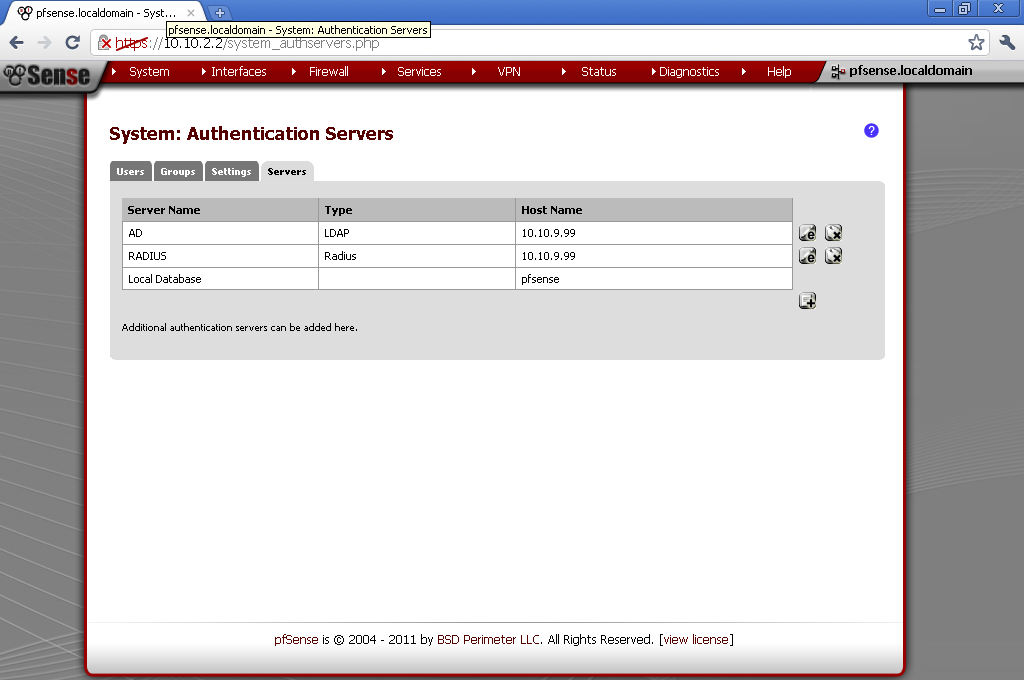
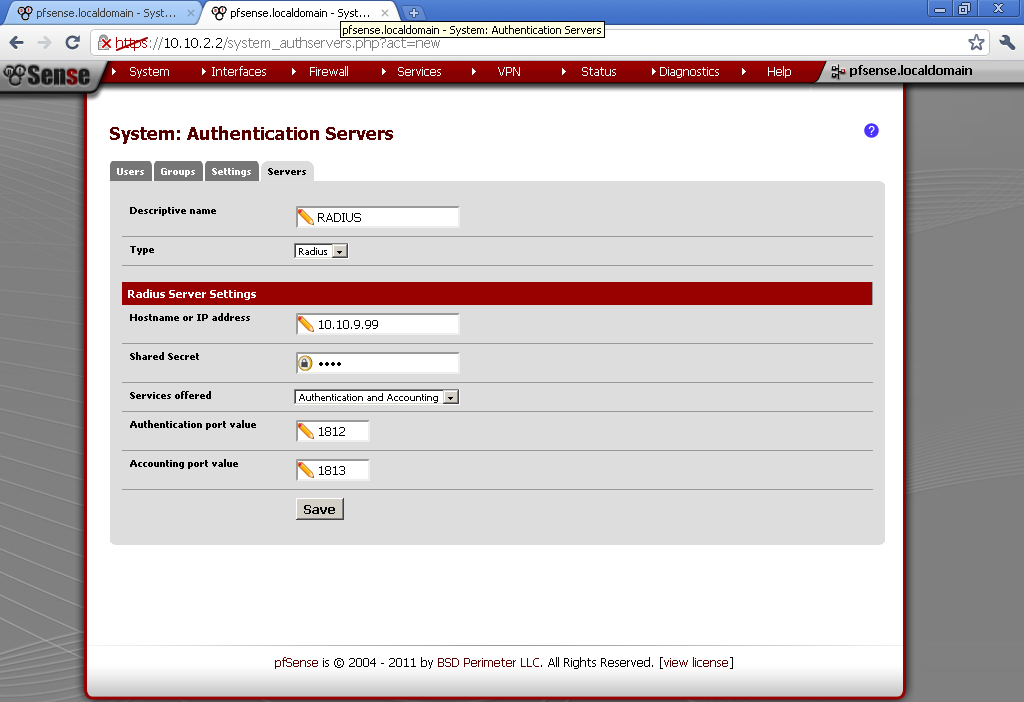
On your pfSense go to System > User Management > Servers add new.

Enter descriptive name of your liking. As type select Radius. Enter the IP address of the server that we just configure to be our RADIUS server. Under Services offered, leave the default Authentication and Accounting. Take note that we have not configured accounting on our NPS service, but you could easily enable it. The default ports are fine. If you have Windows Firewall, or some other kind of firewall service running, make sure required ports are open.

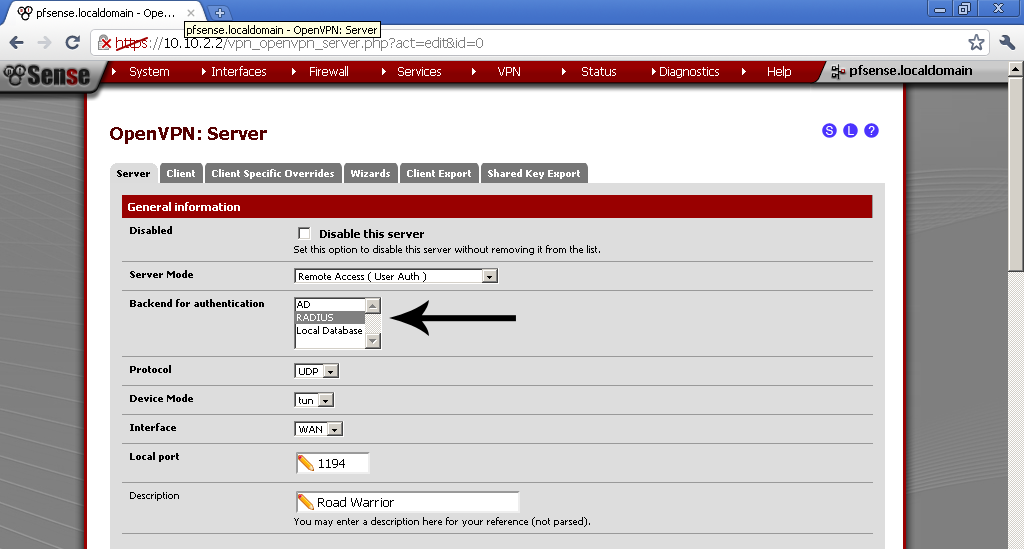
It is time to go to your OpenVPN Server configuration and select our new RADIUS provider as Backend for authentication.

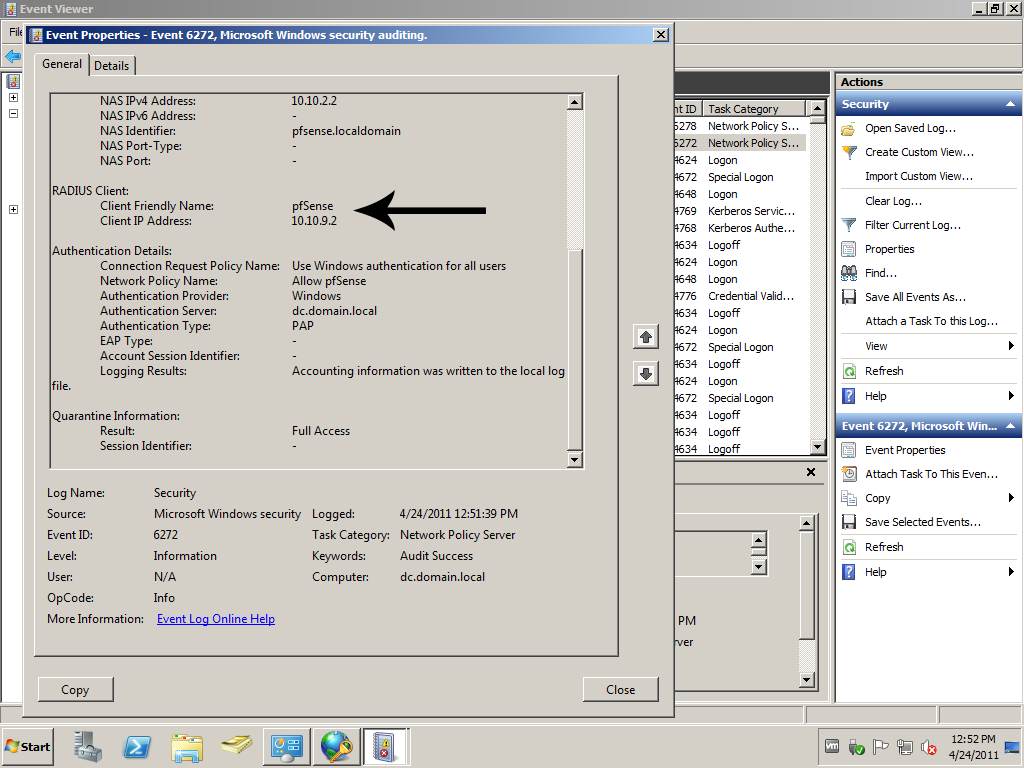
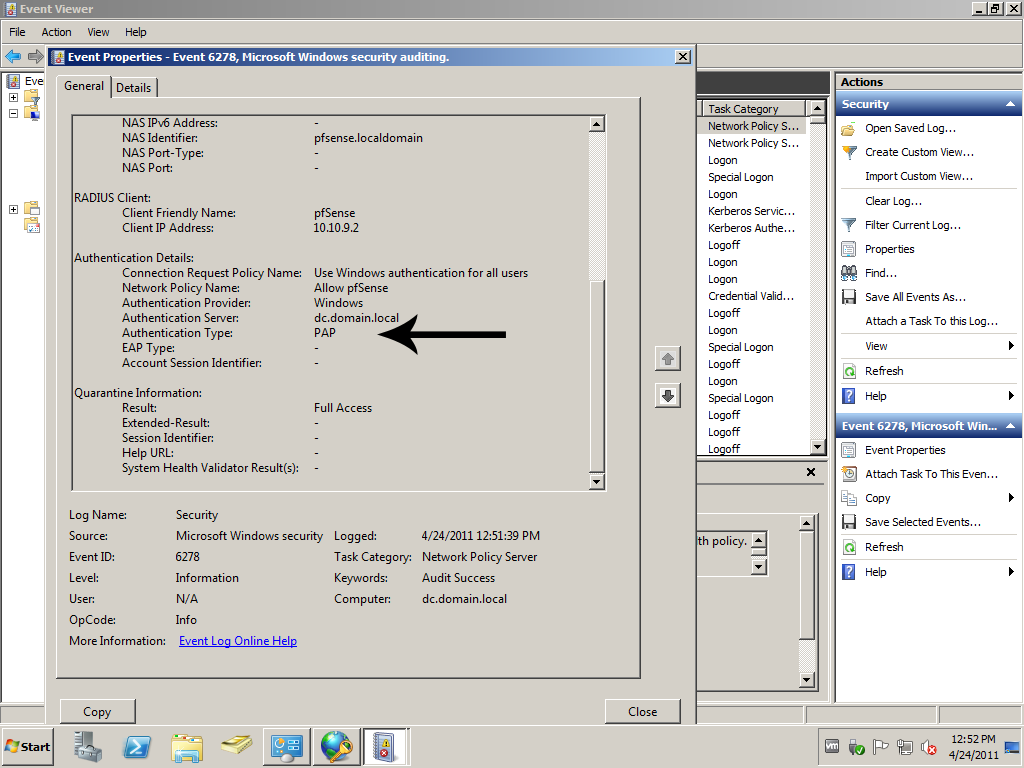
Now if you make test connection with test user, take a look at the security logs on the RADIUS server.

You will see RADIUS Client Friendly Name match out configuration, and which Policies were used,and that the Authentication Type is PAP, that is why we added it to the policy earlier.
That’s it.

Posted in TechnicalTagged ADDS, OpenVPN, pfSense, RADIUS, Windows Server 2008 R25 Comments

OpenVPN with LDAP authentication on pfSense 2.0 RC1

Posted on 22/04/2011 - 18/02/2019 by Stefan

In the last post I’ve used Local User Database for authentication with the OpenVPN Server, but managing users in multiple places is redundant and should be avoided. If your users resides in Windows Domain why not use a Domain Controller for authenticating VPN users.

That’s way now we will use Active Directory.

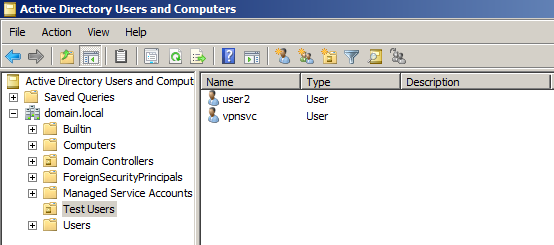
For the purpose I’ve setup a Windows Server with Active Directory Domain Services. In a new Organization Unit called Test Users, there are a service account (domain\vpnsvc), and user account with witch we’ll do the tests (domain\user2).

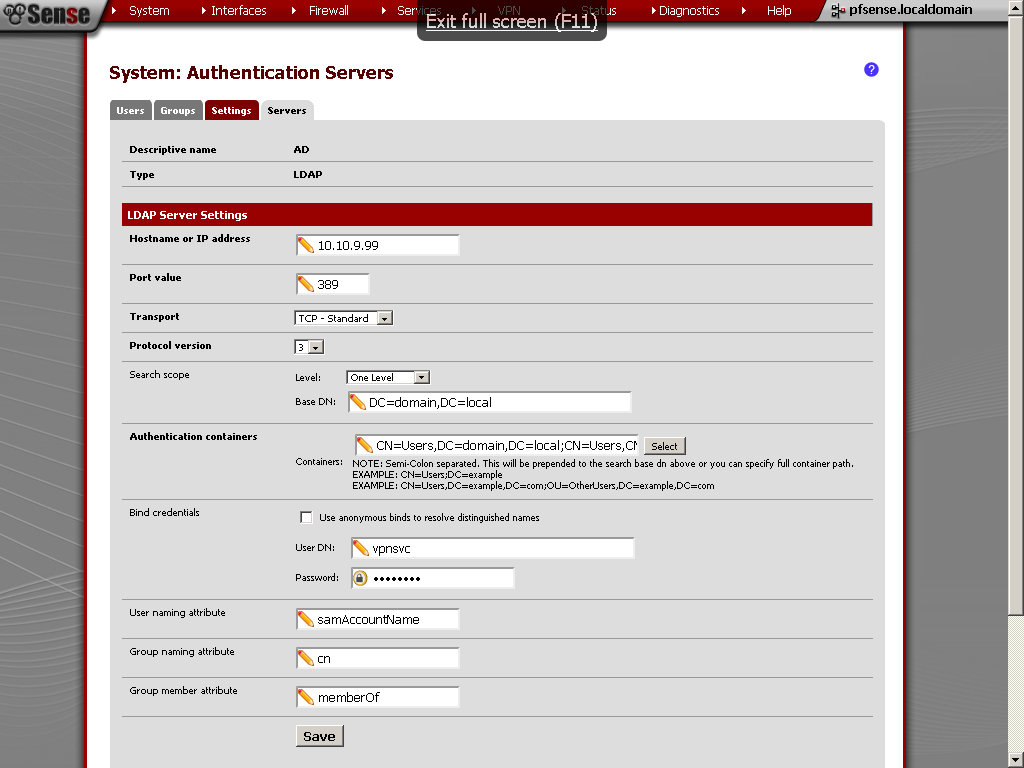
On the pfSense go to System > User Manager > Servers


Add new one with the + sign button.

For Type select LDAP
Enter the IP address of your Domain Controller


In the Search scope, you have to enter the Base DN, you can find it by using ADSI Edit.

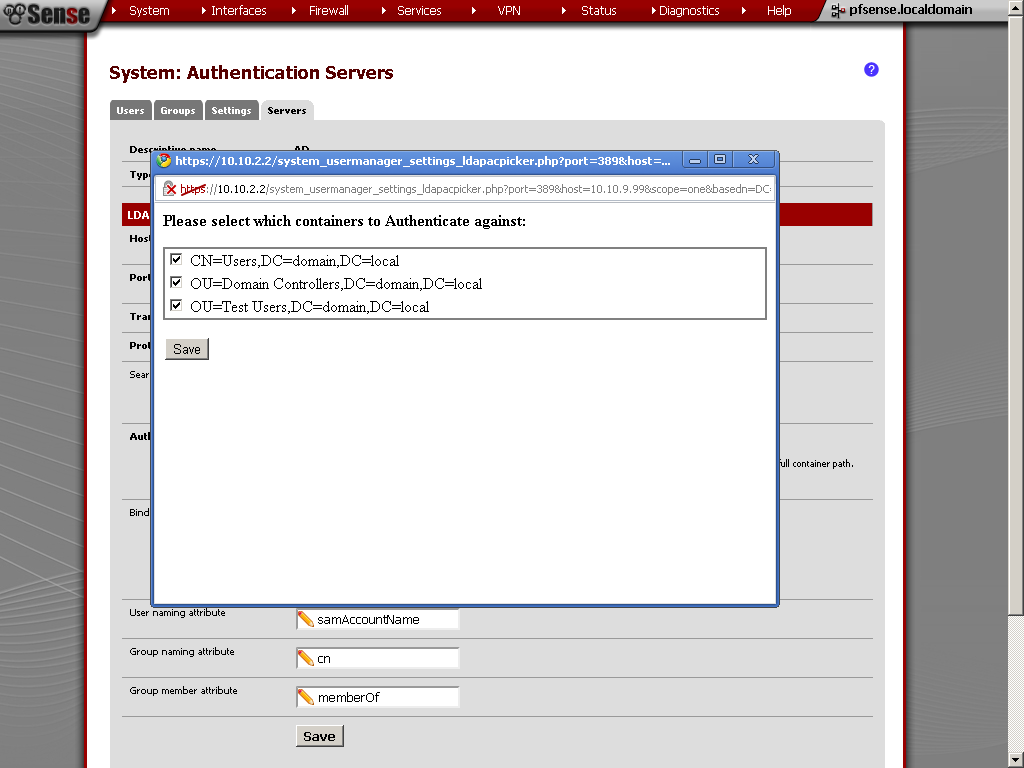
Now for Authentication containers, click on Select button and choose the ones in which users that will have access through VPN are.


Remove the tick from Use anonymous binds to resolve distinguished names, and enter the credentials for your service account. In my case this is the domain\vpnsvc service account.
For initial Template select Microsoft AD

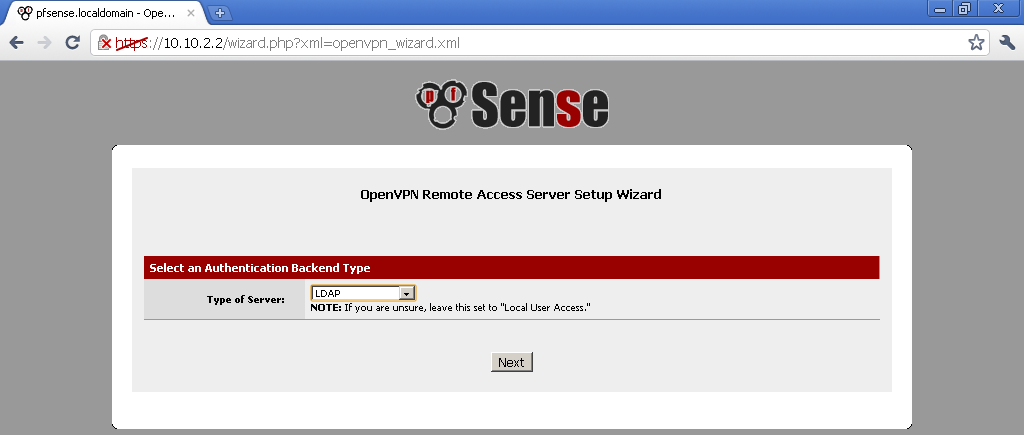
Now on the Wizard for creating new OpenVPN Server
As Type of Server select LDAP

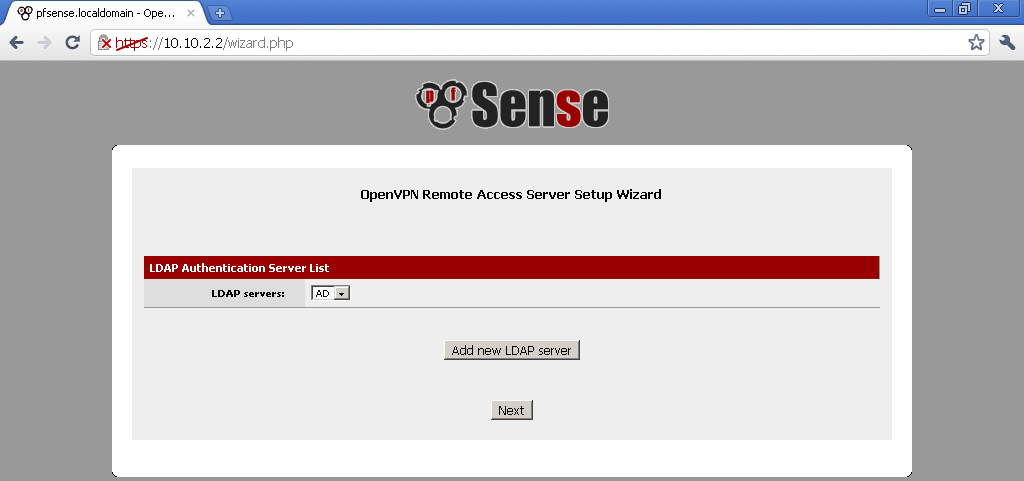
As a LDAP server, select the connection that we have configured just now.

Continue with the configuration of the OpenVPN server as usual, for references you can check my previous blog post on the topic pfSense 2.0 RC1 configuration of OpenVPN Server for Road Warrior with TLS and User Authentication

Now you can connect to the VPN using domain users account, in my example domain\user2.

I’ve test is and now if you disable some user account in Active Directory, you will not authenticate with the AD, and consequently connect to the OpenVPN.

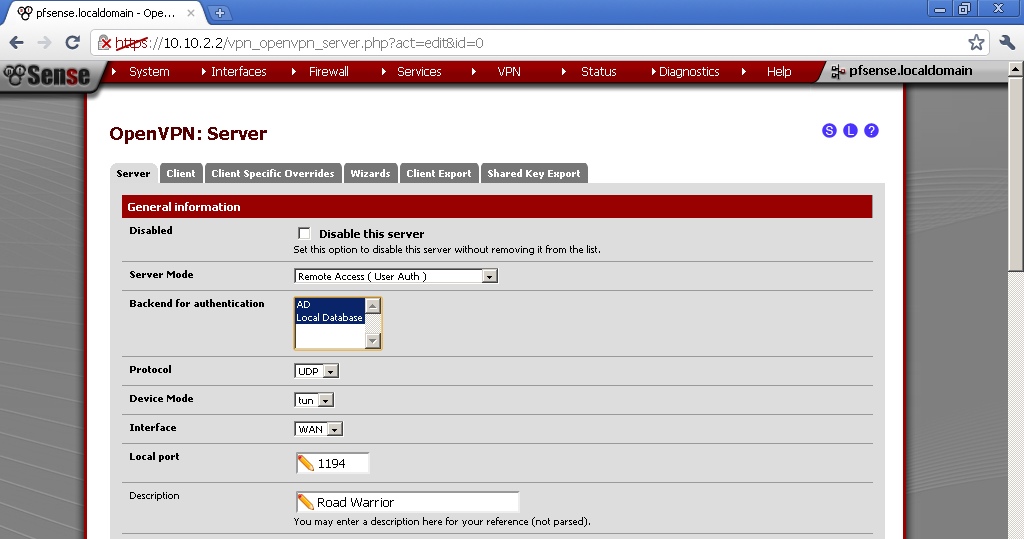
To extend the configuration you can use multiple backend service to authenticate. Open you OpenVPN server configuration and in the section Backend for authentication select also the Local Database, or any other available to you. There is a little flow in this method. If you have a user with the same user name and the same password, the request is send first to the AD and after that the local database is queried for the user. I’ve guessed it after a little network sniffing. However how often would you have duplicate users in both databases at the same time? So this is just for your information.

Thank you for reading, have fun.

Posted in TechnicalTagged ADDS, LDAP, OpenVPN, pfSense, Windows Server 2008 R217 Comments

pfSense 2.0 RC1 configuration of OpenVPN Server for Road Warrior with TLS and User Authentication

Posted on 17/04/2011 - 18/02/2019 by Stefan

VPN is very important service nowadays. The possibility to connect to remote network is very powerful feature used by single user accessing files at home to thousands of business users working remotely with applications and services available previously only on their desktops in the office.  Because of that there are many alternative on the market providing such service. In this post I will focus on the OpenVPN running on the new version of pfSense 2.0 RC1. The goal is to compare the new features with the capabilities of the older 1.2.3 version.

One of the reasons choosing OpenVPN was for the rich feature set, small system requirements the level of control. You can easily setup is up on virtual machine or on SoHo router. The possibility to authenticate users not by insecure usernames and passwords, but by certificates was very compelling.

On 1.2.3 version of pfSense, instead of generating the certificates on the router, I was generating them on a Windows Machine. Following guidance from this sources:

http://www.runpcrun.com/howtoopenvpn

http://openvpn.net/index.php/open-source/documentation/howto.html#pki

After generating all the required certificates, it was just a matter of copy / paste in the configuration.

In the new 2.0 version of pfSense there is a Cert Manager. Using it you can manage your certificate on the box, not just pasting pre-generated certificates.

The other new feature that we will use is User Manager. You have three options for central location of your users: local database, LDAP and RADIUS.For this post we will use local database, as it is the easiest way.


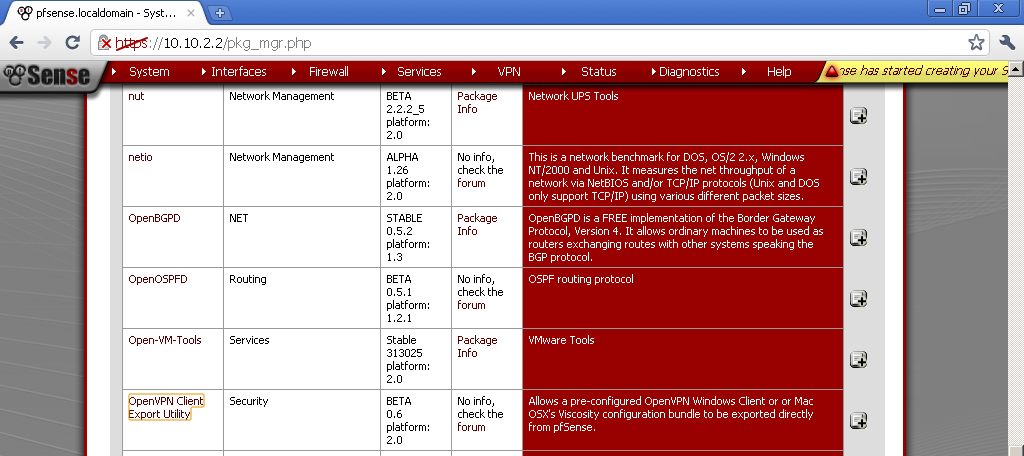
As a first  step, let’s install the “OpenVPN Client Export Utility” package, from System > Packages. We will need it later.

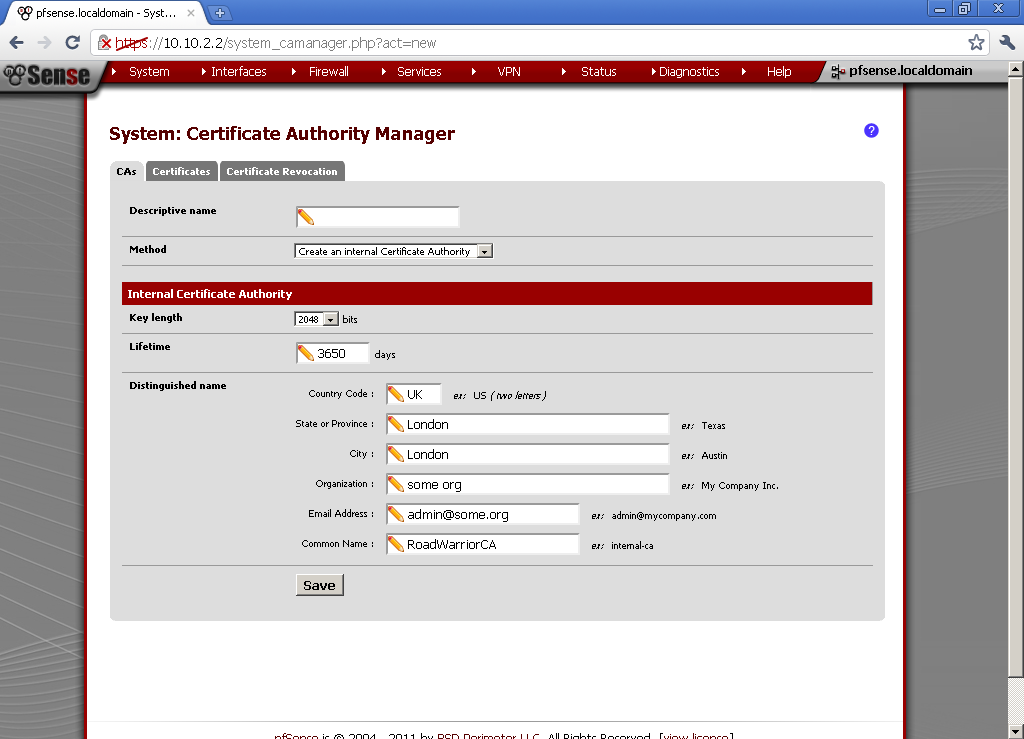
Then go to System > Cert Management. On the CA (Certificate Authority) leaf, create new one. Take a note of the Descriptive and Common names you give it, we will need them later. Enter the rest of the details for the CA.

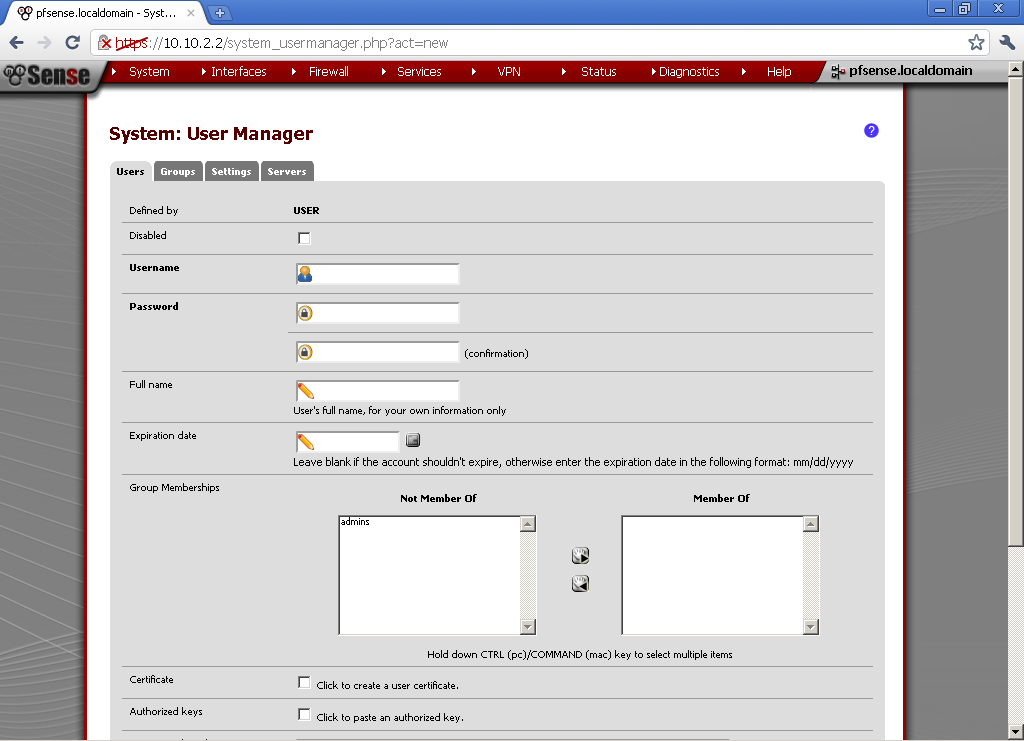
Now under System > User Management, create new user account.Tick in the Certificate section “Click to create a user certificate.”, or after the user is created, enter the newly created user account and generate a certificate for the user. As a Method select “Create an Internal Certificate”, enter the Distinguished name details.

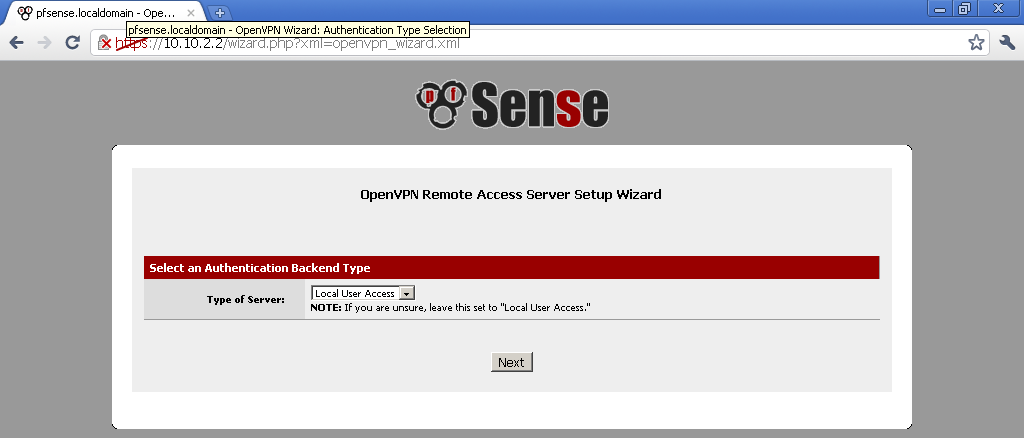
Now is time to configure the OpneVPN server. Go under VPN > OpenVPN, select the Wizard leaf.

For type of Server, select Local User Access

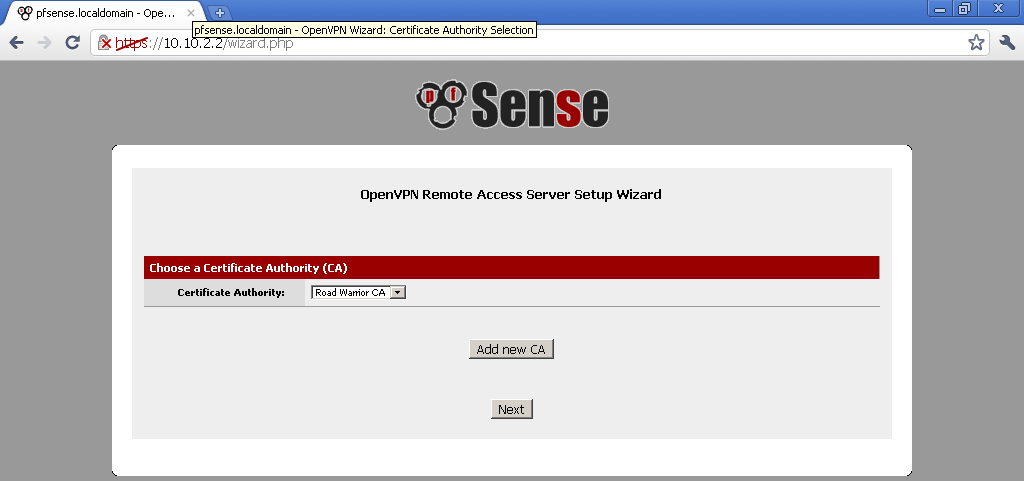
For Certificate Authority Select the name of the one we created earlier, in our case Road Warrior CA

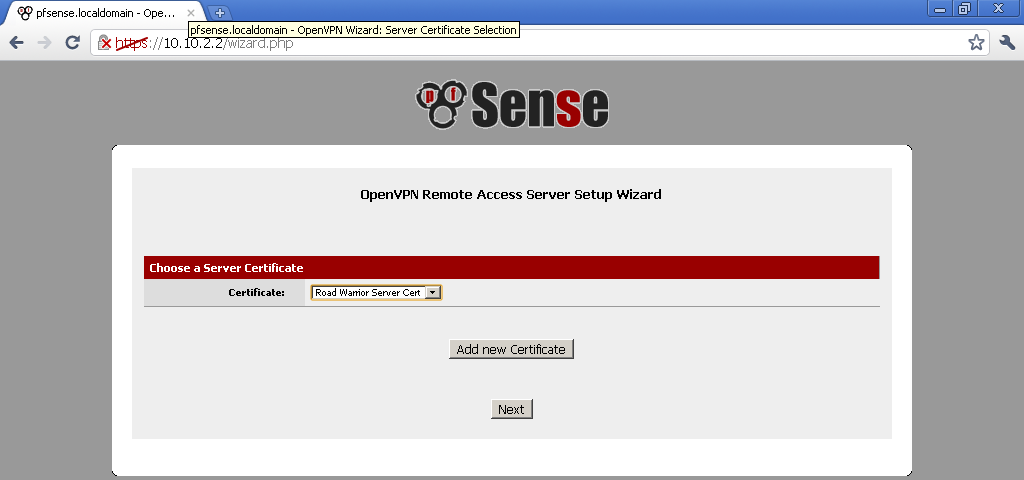
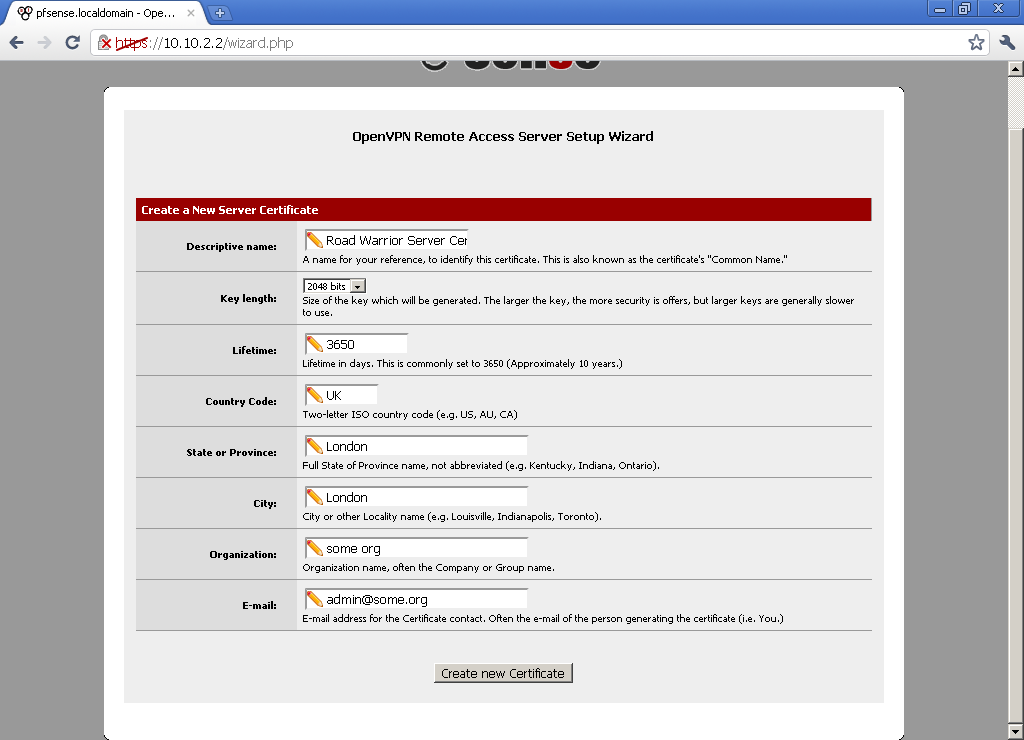
For Server Certificate, select Add New Certificate, type in something memorable for Descriptive name, because we will use it right away.


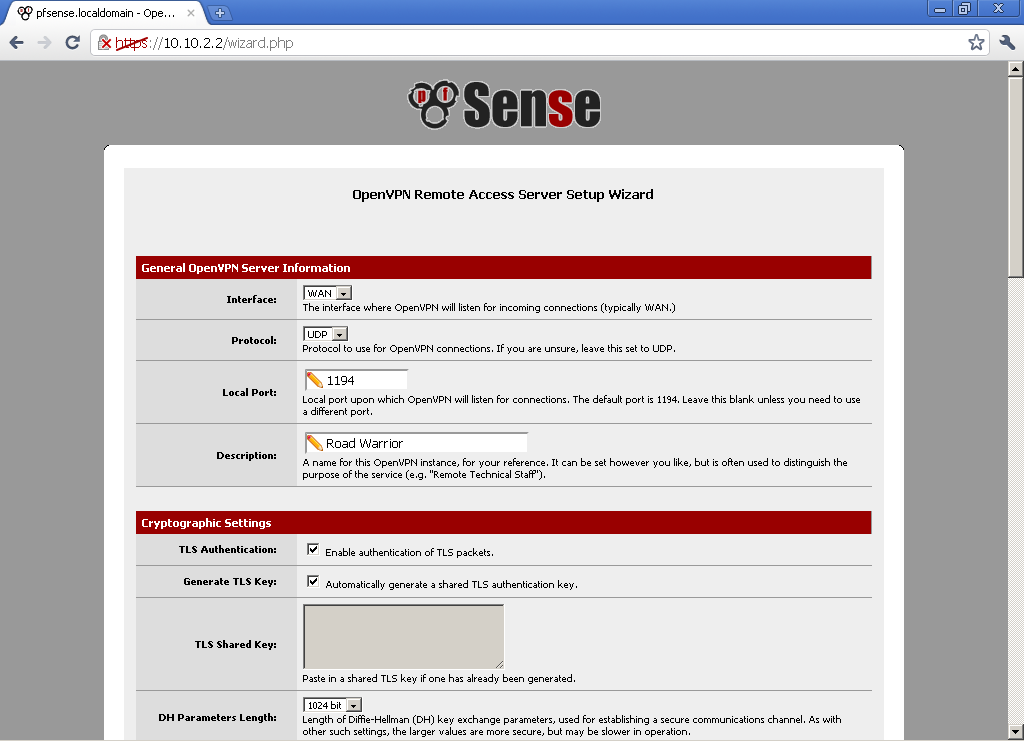
Now edit the configuration of the OpenVPN server. On this page you can enable TLS.

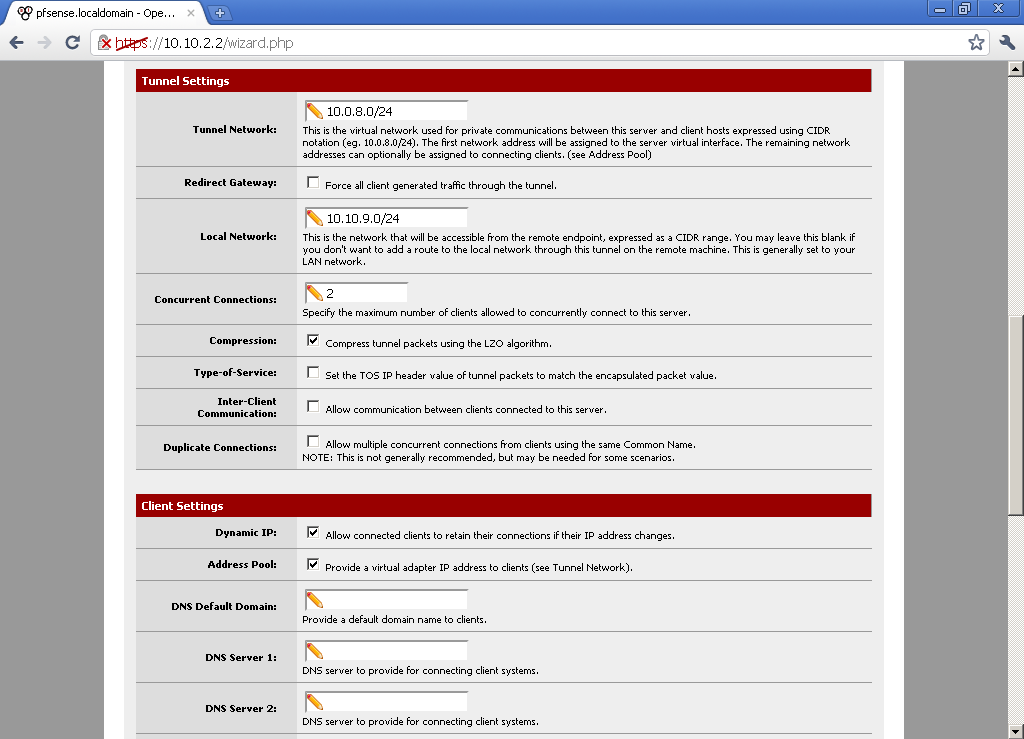
Select the size of DH, Encryption Algorithm.for Tunnel Network choose a subnet that different from your LAN subnet. In the Local Network enter your LAN subnet. Decide on the number of Concurrent Connections, and if you want to use compression.

As this is a very basic configuration, we won’t enter DNS servers, and Default Domain, but you should consider these options, depending on your environment.

Now go to VPN > OpenVPN, select the Client Export leaf. The package that we have installed in the beginning gives us the possibility to automatically export archive with the user configuration files.

Find the user for whom you want to export configuration, and click on the Configuration archive link.

If you haven’t already download the OpenVPN client, download and install OpenVPN Client with GUI from Here

Now open the Configuration Archive and extract the files in this location on the machine from which you are going to establish the VPN connection.

C:\Program Files\OpenVPN\config\


You should be able to successfully connect to your VPN from outside.
The management of users and certificate is much easier in pfSense 2.0. You don’t have to keep a Certificate Authority on separate box, and the discomfort with transferring the CRLs is gone. The utility that generates bundles with the required certificates and configuration for each user automate most of the tedious manual work from the previous version.

As a bonus I have recorded the process of configuration, you can check it out here:


Posted in TechnicalTagged OpenVPN, pfSense28 Comments

1 : 1 NAT in pfSense and DD-WRT

Posted on 08/04/2011 - 18/02/2019 by Stefan

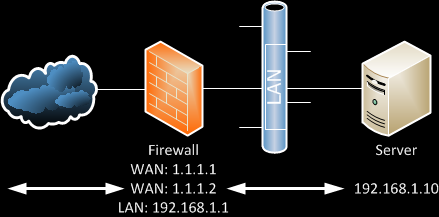
Sometimes you need to map internal machine IP to real IP address accessible from the Internet.As on the diagram if someone makes a request to 1.1.1.2, the request is send to 192.168.1.10.

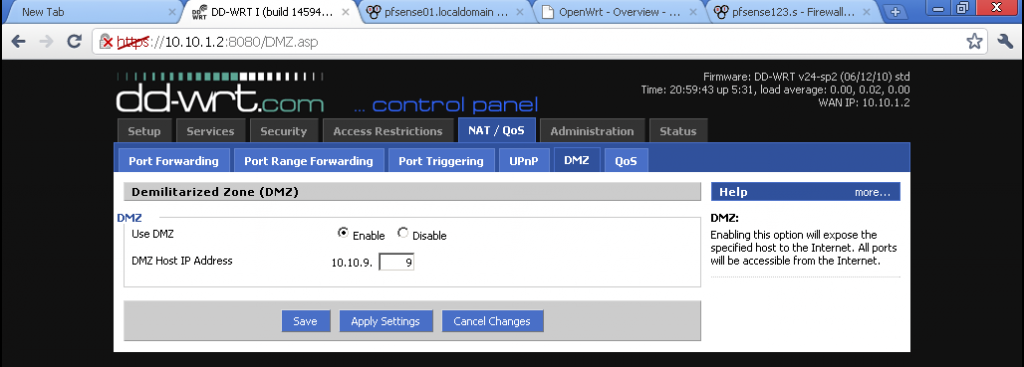
On DD-WRT you can use DMZ. This service is pseudo-DMZ, more commonly known outside of the SoHo routes as Exposed host.

To set is up enter the NAT / QoS section, then select the DMZ subsection, and configure your internal IP. For more information read here

Be warned that exposing all port of a machine to the Internet is very insecure, and even worse if the machine does not have some kind of firewall.

In pfSense, the alternative is to use VIP and 1:1 NAT

You can’t do that in 1.2.3, if you have only one WAN IP, if you do an error message appears: “The WAN IP address may not be used in a 1:1 rule”. Alternative is to make a port forward, which is much more preferable especially if not all ports are included.

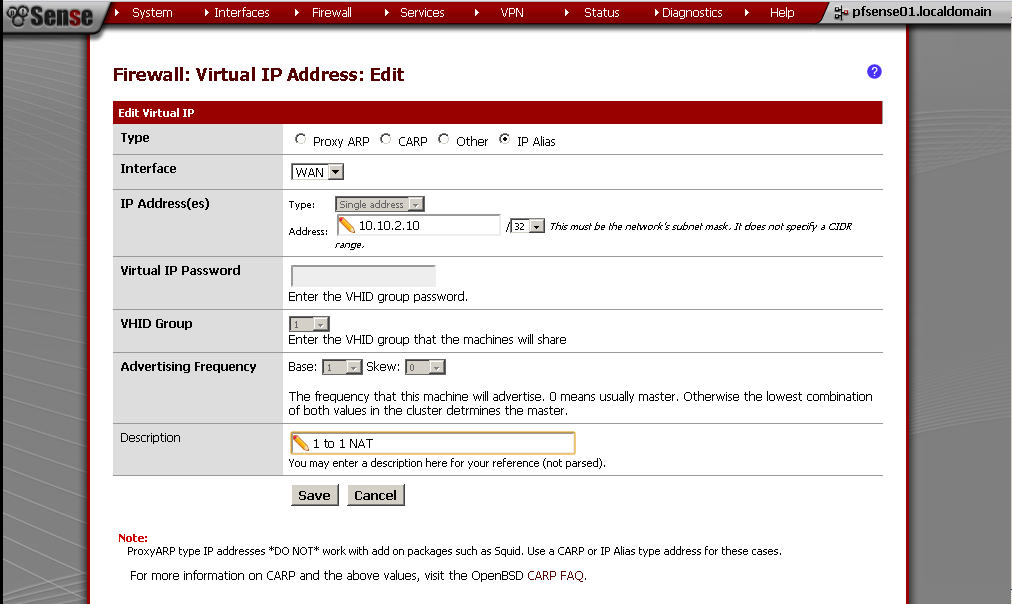
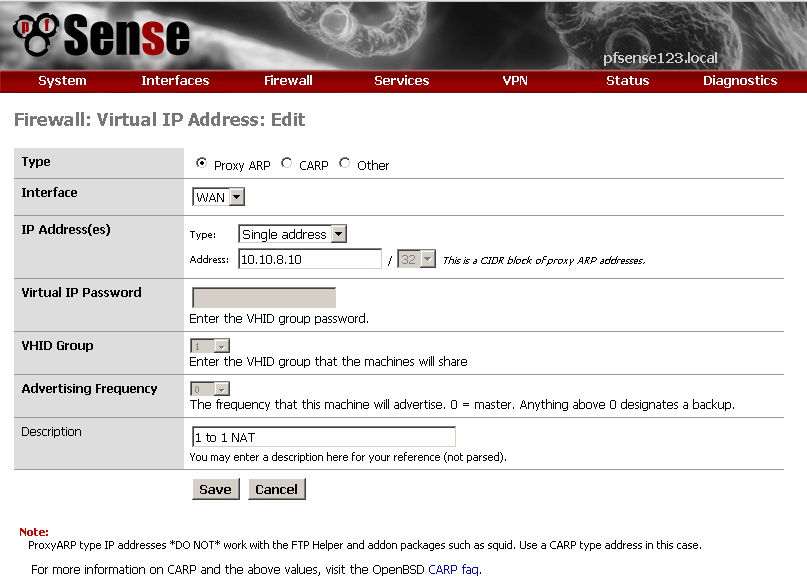
So first you must add your additional WAN IP in the Virtual IP section.

For Type you can choose between Proxy ARP and CARP, detailed explanation why check out here

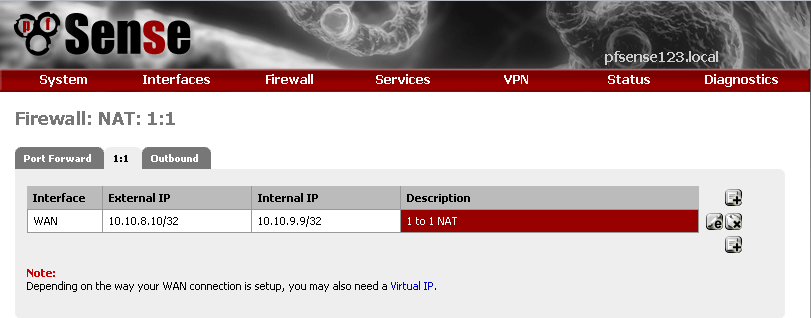
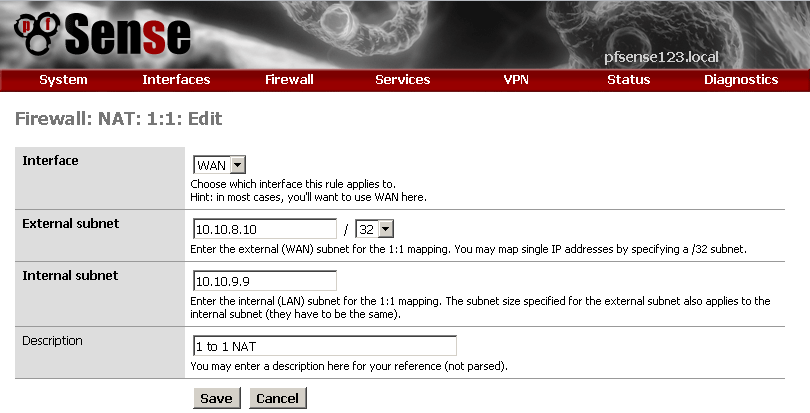
Then create a 1 : 1 NAT rule

Nothing special in the configuration, just enter your internal and external IPs and description for the rule.

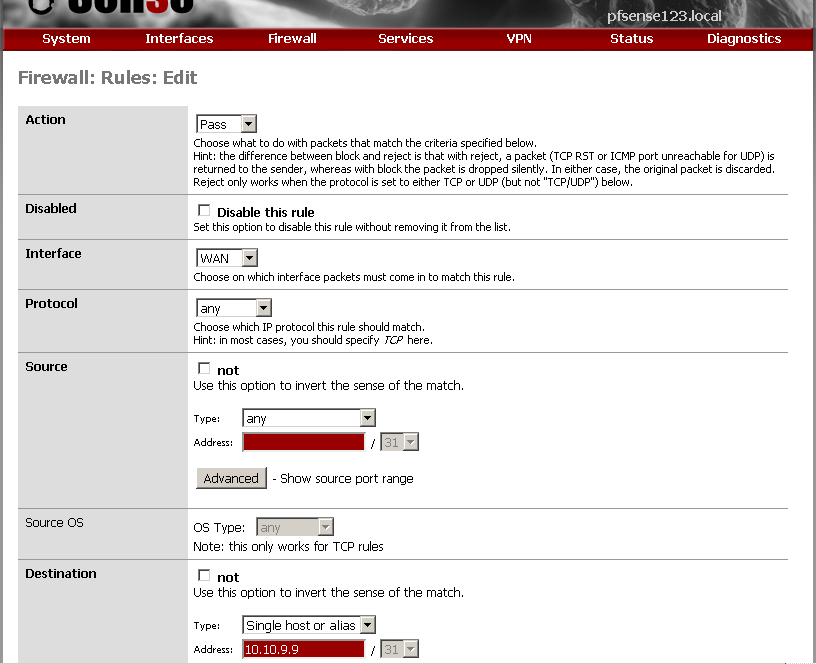
You must make a firewall rule for all this to work, enter the internal LAN IP address as destination.

On pfSense 2.0 RC1, except the huge amount of new options the only difference is the new option in the Virtual IP type selection. The IP Alias works fine in this setup. The other good news is that even if you have only one WAN IP address you can use is in such setup. The bad news is that you do use it you can’t use your WAN IP for anything else, all port on the WAN IP are mapped to the machine on the LAN.

Alright so far this was the case if you have need to publish only one IP, but if you need to do this for multiple machine and have more than one WAN IP address, the procedure is a little different.

On pfSense you just repeat the procedure as many times as you need.

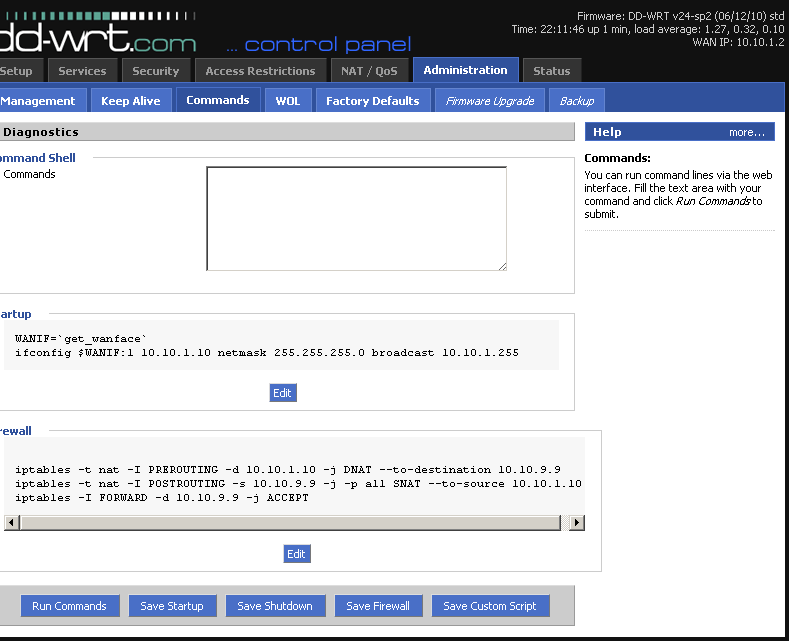
On DD-WRT you can add some iptables rules.

Add these lines to the Startup script:

WANIF=`get_wanface`

ifconfig $WANIF:1 10.10.1.10 netmask 255.255.255.0 broadcast 10.10.1.255

This adds the new WAN Ip to the Interface

Add these lines to the Firewall script:

iptables -t nat -I PREROUTING -d 10.10.1.10 -j DNAT –to-destination 10.10.9.9

iptables -t nat -I POSTROUTING -s 10.10.9.9 -j -p all SNAT –to-source 10.10.1.10

iptables -I FORWARD -d 10.10.9.9 -p all –dport all -j ACCEPT

10.10.1.10 – this is the WAN IP address

10.10.9.9 – this is the LAN IP address

Add these lines for as many IP as you have / need. More on the topic here.

In conclusion, this is a very quick and dirty way to publish internal machine to the internet, bear in mind that this host is fully exposed to anybody on the Internet. I personally don’t recommend this way of publishing, but if need arise you can consider this an option. In future posts I will try to present more smart and safe ways to publish some service.

Posted in TechnicalTagged DD-WRT, pfSense5 Comments

Running DD-WRT on VMware Workstation 7.1

Posted on 03/04/2011 - 18/02/2019 by Stefan

Now that’s a tricky one.  The only official build that could be found is here

But it was published in the middle of 2008.  It is a pure v24, no Service Packs, this by itself makes it useless.

Guide for installing newer version is not available.

After searching the forums, the only usable thread that I found is this: VMware ready to use ..

Here stalonge share a pre-installed virtual machine ready to use.

My recommendation is to Restore it to Factory Default, and configure it to your preference.

Posted in TechnicalTagged DD-WRT, Network, VMWare

Tags

ADDS AES-NI Asterisk ASUS Azure Captive Portal Cell Phone CentOS Certification Creative DD-WRT DNS Hyper-V LDAP Learning Linksys Microsoft Mikrotik RouterBoard RB250G Network OpenLDAP OpenVPN OpenWrt pfCenter pfSemse pfSense pfSense 2.0 RC1 pfSense 2.0 RC3 pfSense 2.2 PKI RADIUS Raspberry Pi Routing Site To Site Technical Uncategorized VLAN VMWare VoIP Vyatta Web Sites Windows Server 8 Windows Server 2008 R2 Windows Server 2012 R2 Wireless Workstation 8

Archives

  • April 2020
  • July 2019
  • May 2019
  • March 2019
  • February 2019
  • October 2018
  • August 2018
  • March 2016
  • April 2015
  • March 2015
  • January 2015
  • February 2012
  • October 2011
  • September 2011
  • August 2011
  • July 2011
  • June 2011
  • May 2011
  • April 2011
  • March 2011
  • February 2011
  • July 2010
Proudly powered by WordPress | Theme: micro, developed by DevriX.